Getting Started
Step 12
Editing Your Inbox Tasks
Once you’ve added your Inbox tasks, you can begin setting due dates & times, recurring tasks, reminders, priorities, task organizers, web links, and notes for any tasks as needed.
These settings are optional.
To get started:
1 – Open The Task Editor:
Tap or click on the Task Editor icon on the far right of the task you want to edit. The Task Editor will appear as shown below so you can begin editing your task.
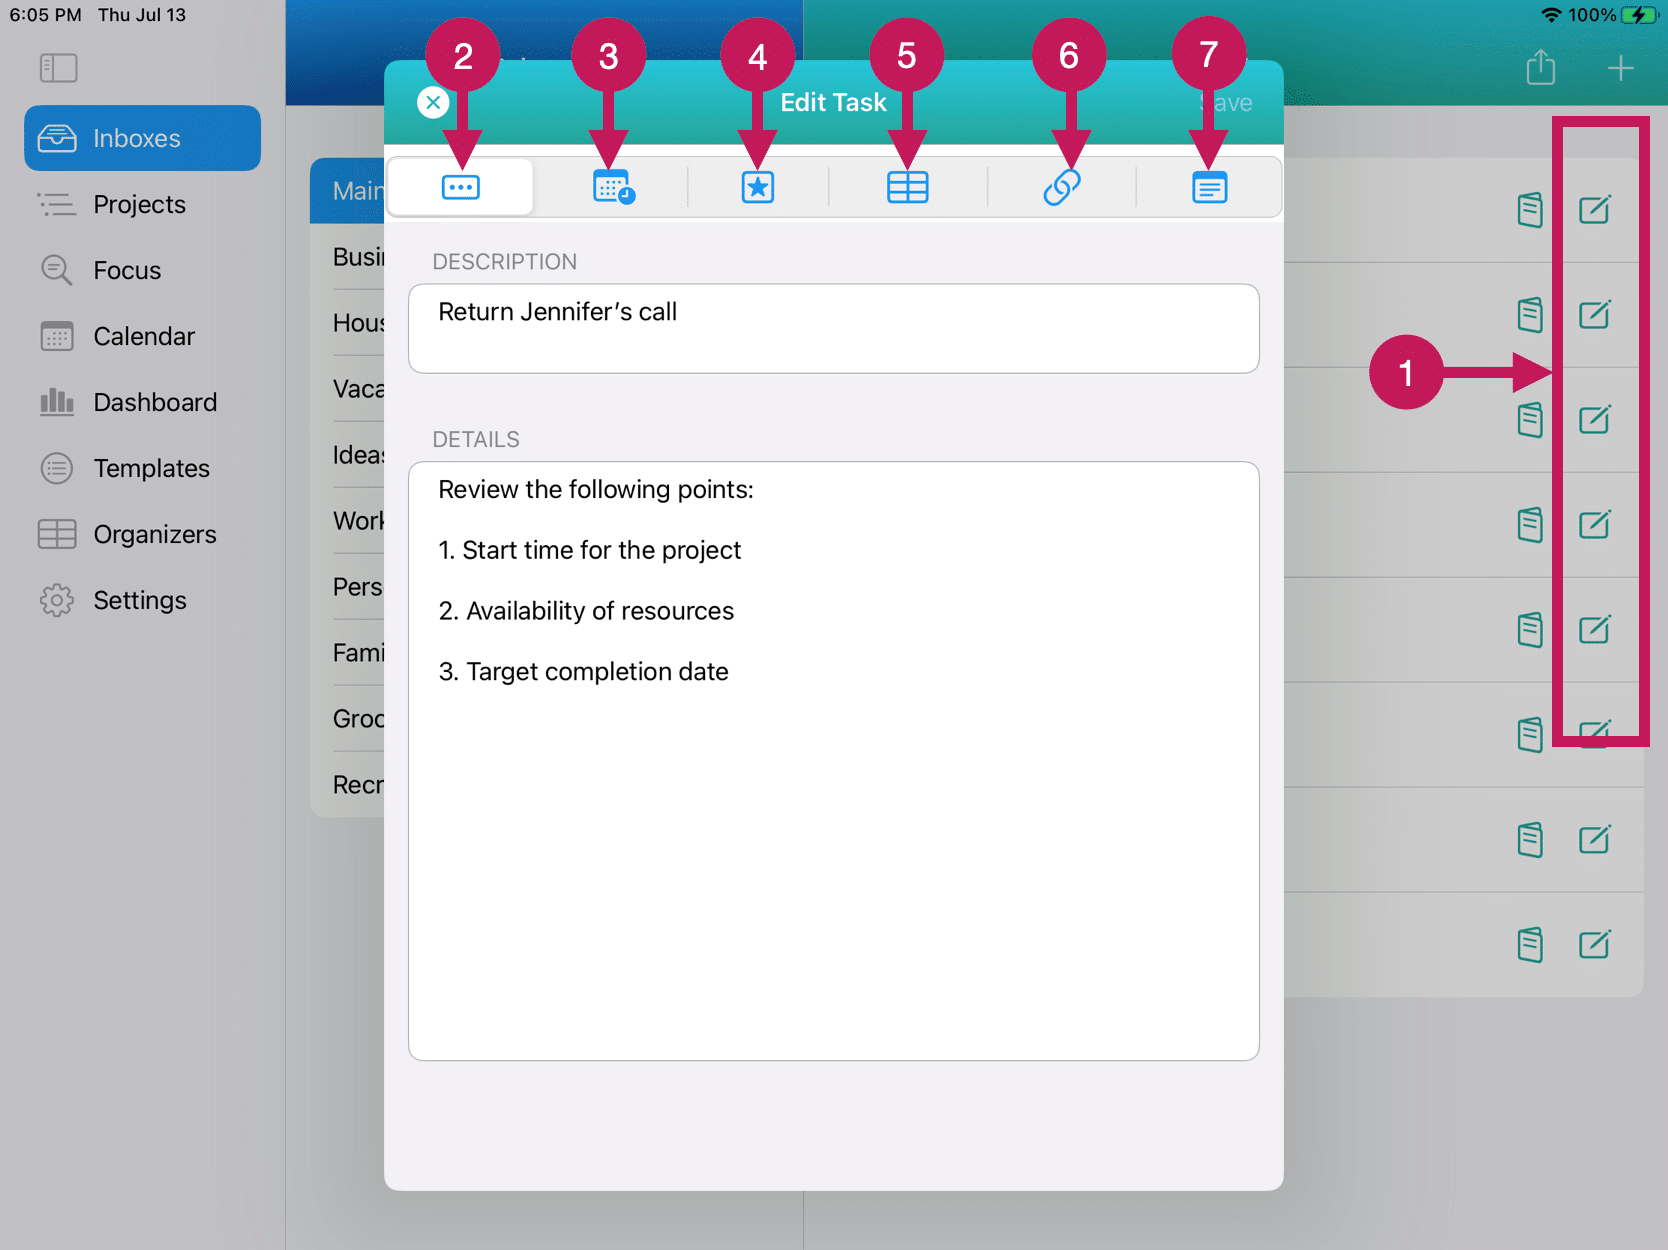
The following is a brief explanation of the numbered items from the Task Editor graphic above:
2 – Task Description & Details Tab: shows the task description as well as the Task Details field. You can make any changes to the Task Description that you’d like. The Task Details is basically a long note field where you can add, change, append, or delete any text that you want.
3 – Date & Time Tab: this is where you set or change any date-related elements for the task. This includes due date, start time, and duration, as well as recurring tasks and reminders.
4 -Priorities Tab: this is where you will set or change the priority levels for Importance, Urgency, Impact, and Effort. Red is highest, Orange is major, Amber is medium, teal is some, and blue is low. Black is none or not set.
5 – Organizers Tab: these are where you can assign Task Organizers to your task. There are six (6) different Task Organizer Categories – Task Type, List Group, Context, Location, Task Status, and Tags.
6 – Web Links Tab: you can add an unlimited number of web links (URLs) to utilize when you need them. It’s best to copy and paste the URL from your browser so that it includes the full URL. For example, use https://ideastodone.com rather than ideastodone.com or www.ideastodone.com.
7 – Notes Tab: you can add an unlimited number of notes, and each note can contain an unlimited amount of text.
Within the Task Editor, you can add, change, or delete the various task setting elements as you see fit. None of the task settings are required except for the task description.
Below are the descriptions of each tab in the Task Editor and how to set them up.
Task Description and Details Tab
The first tab in the Task Editor is the Task Description and Details Tab. This is where you can modify the Task Description. You also have a Details note where you can write notes to your self about the task.
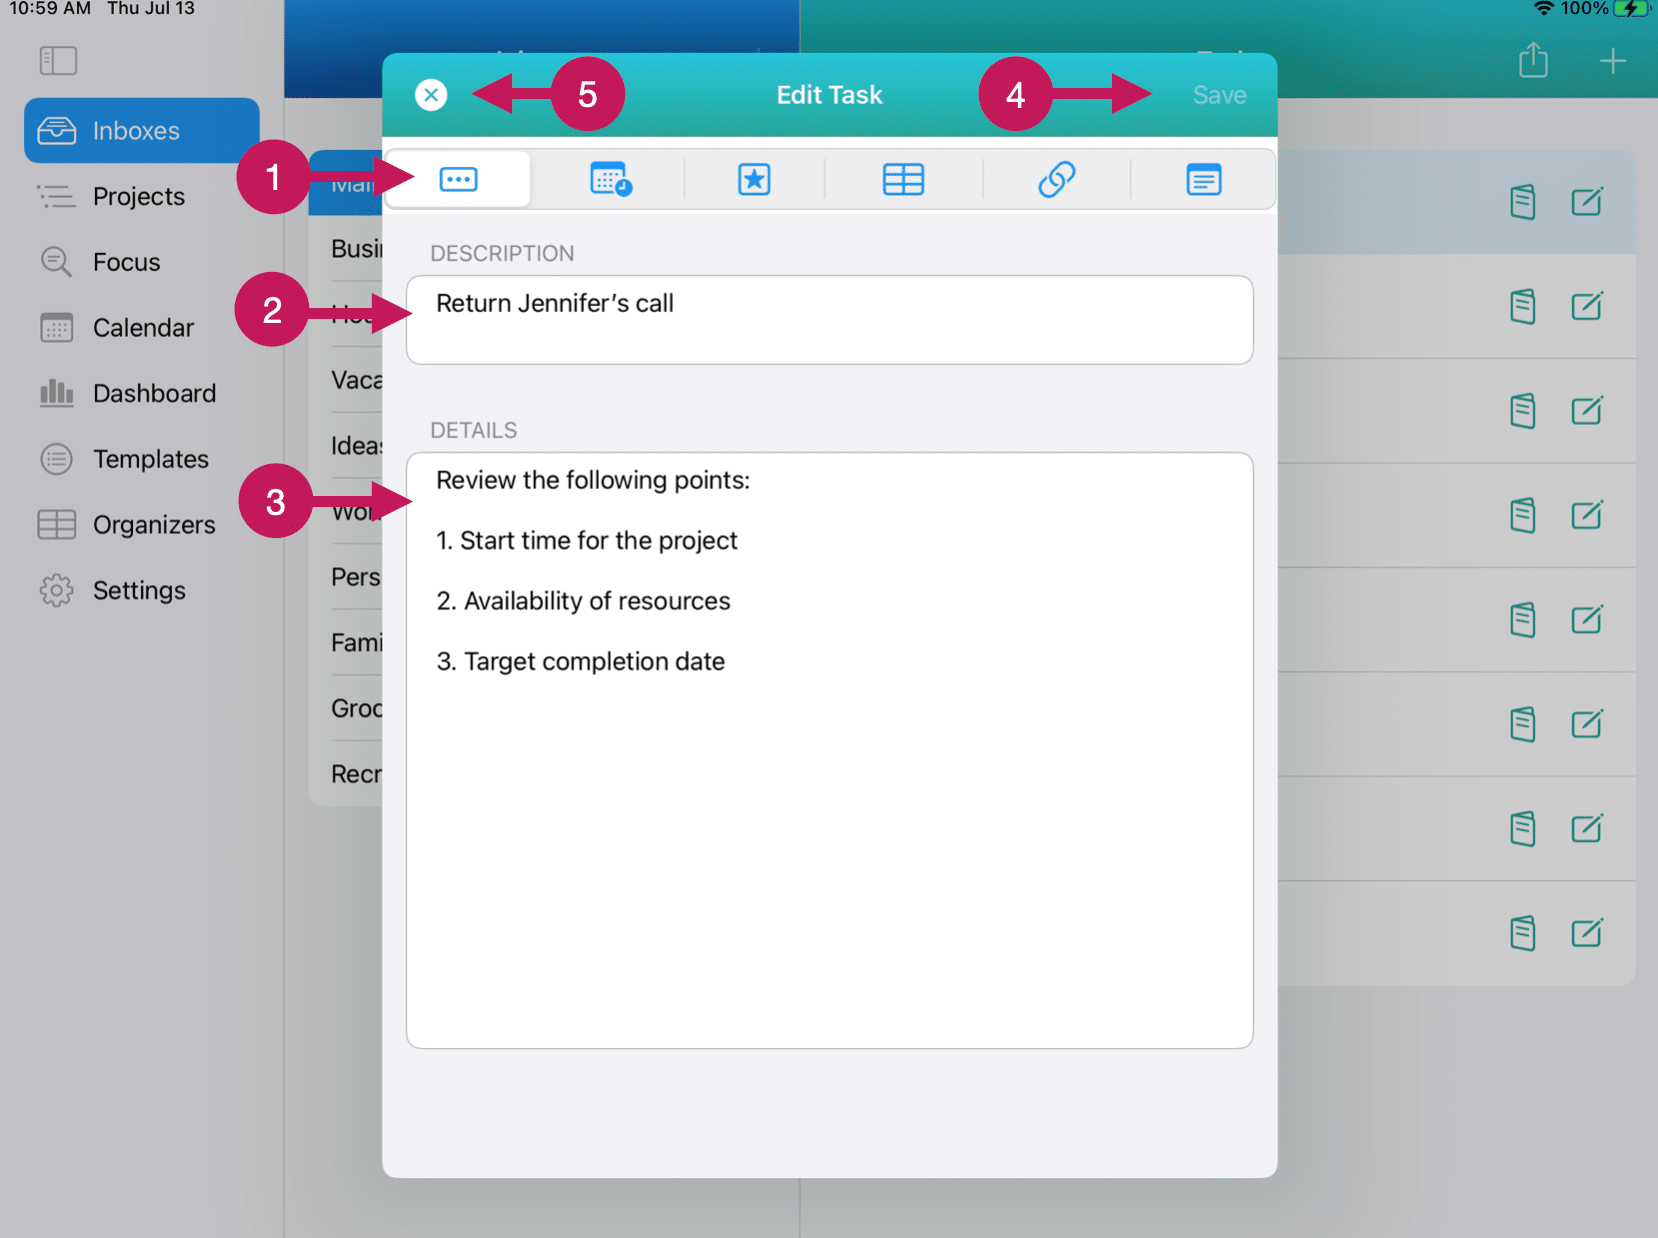
The following is a brief explanation of the numbered items from the Task Editor graphic above:
1 – Task Description & Details Tab:
Tap or click on this tab to bring this tab into view.
2 – Task Description:
This field is required and cannot be left blank. The Task Description should be specific enough to let you know what the task is yet concise enough to display on your screen. You can make any changes to the Task Description that you’d like.
3 – Task Details: The Task Details is basically a long note field where you can add, change, append, or delete any text that you want. It is not required but can be helpful to you for certain tasks. There is practically no limit to the length of the note, and this note is scrollable.
4 -Save Button: If you make any changes, you need to save them. Otherwise, your changes will be lost. Don’t forget!
5 – Cancel: this button will cancel any changes you’ve made and return you to the previous View.
Date and Time Tab
The second tab on the Task Editor Tab Bar is the Date and Time Tab. This is where you’ll set the Due Date and, as needed, Start Time, Duration, Recurring Tasks, and Reminders.
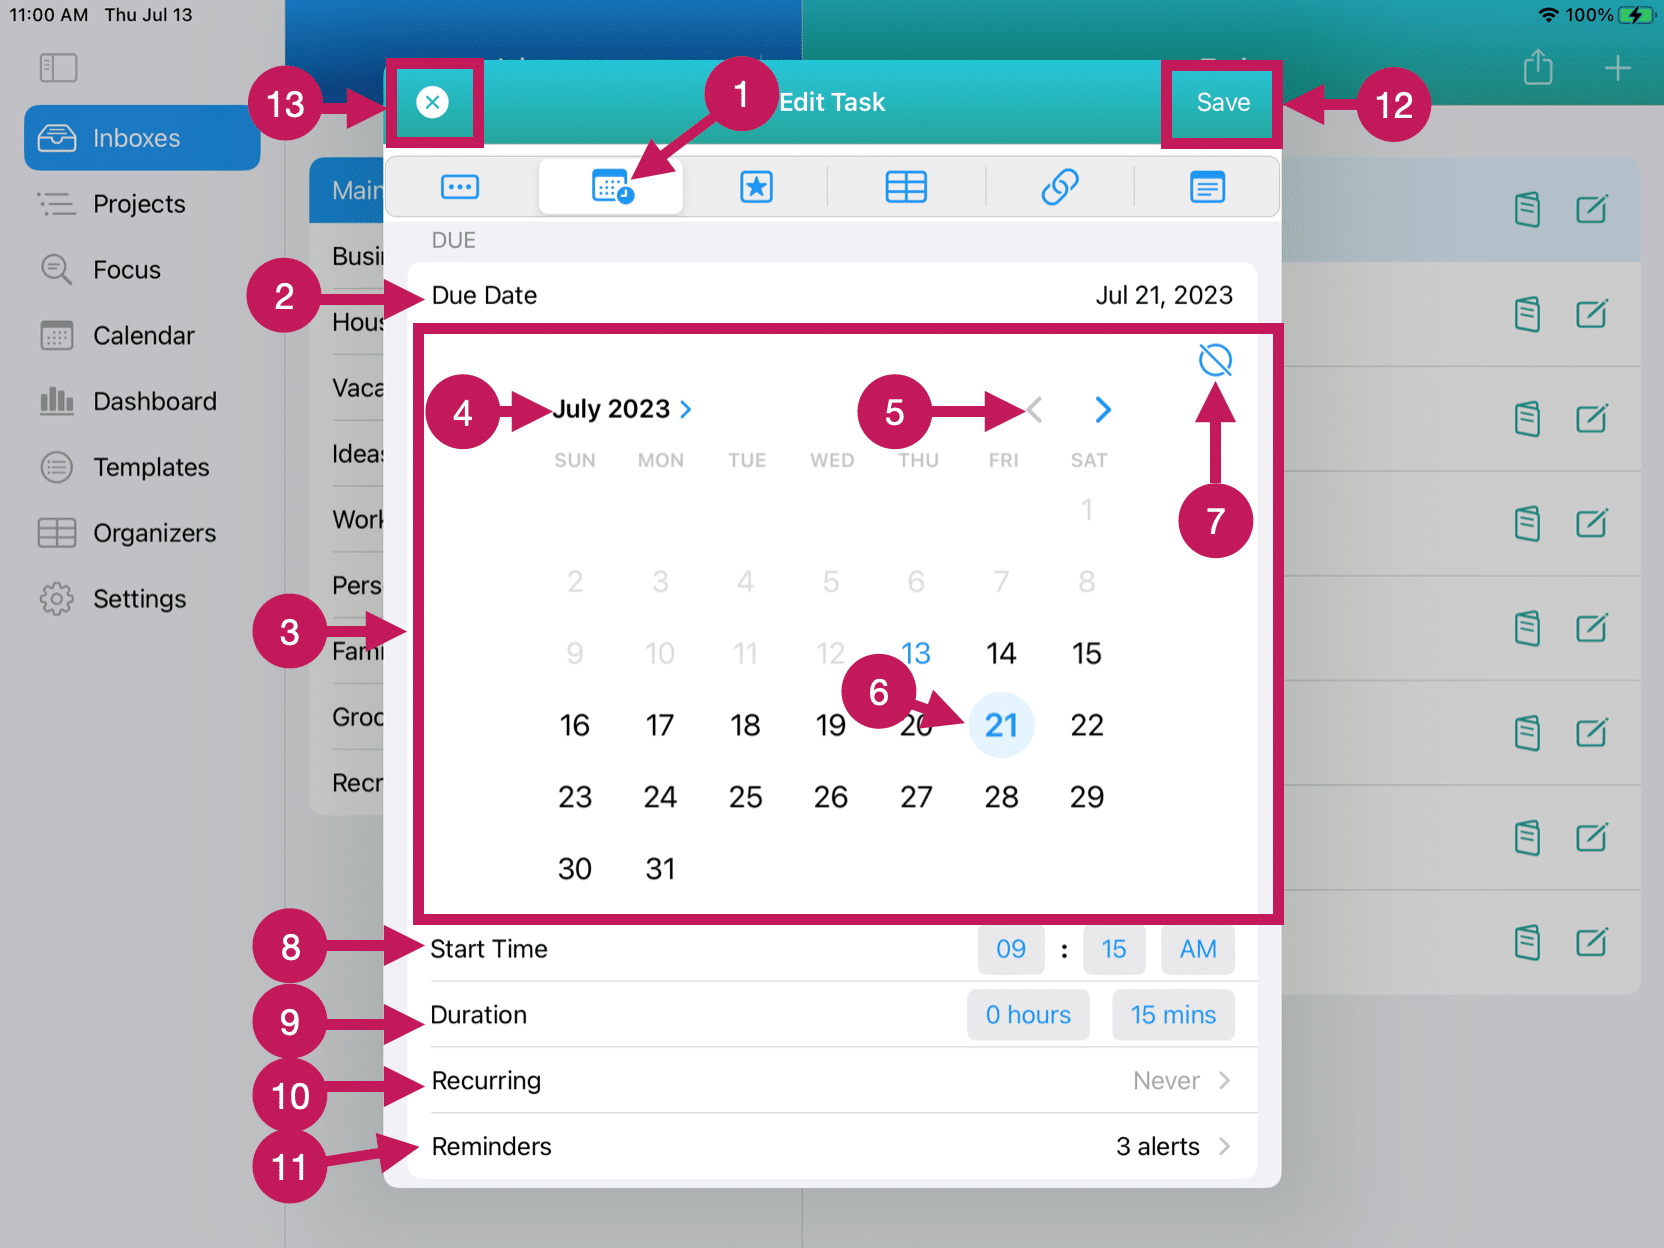
The following is a brief explanation of the numbered items from the Task Editor Date and Time Tab graphic above:
1 – Date and Time Tab: tap or click on this button to bring the Date and Time tab for the task into view.
2 – Due Date: shows the task description as well as the Task Details field. You can make any changes to the Task Description that you’d like. The Task Details is basically a long note field where you can add, change, append, or delete any text that you want.
3 – Date Picker: this is where you set or change any date related elements for the task. This includes due date, start time and duration, as well as recurring tasks and reminders.
4 – Month Selector: this is where you will set or change the priority levels for Importance, Urgency, Impact, and Effort. Red is highest, Orange is major, Amber is medium, teal is some, and blue is low. Black is none or not set.
5 – Month Changer: these are where you can assign Task Organizers to your task. There are six (6) different Task Organizer Categories – Task Type, List Group, Context, Location, Task Status, and Tags.
6 – Current Due Date: this will default to today’s date. You can select a different date by tapping or clicking on that date.
7 – Remove Due Date: tapping on this button will unselect the due date that is currently selected.
8 – Start Time: Set a start time for your task. A start time is required, and it will default to the time you specified in the Setting View, Date and Time Preferences.
9 – Duration: this will default to the duration you specified in the Setting View, Date and Time Preferences.
10 – Recurring: tapping on this button will open the window for setting recurring tasks. Recurring Tasks are covered in detail in Step 28.
11 – Reminders: you can add multiple Reminders for a task. Reminders are covered in Step 29.
12 – Save: this button will save the changes you’ve made and close the Task Editor. You can also go to any of the other tabs to make additional changes before saving.
13 – Cancel: this will not save any changes you’ve made and close the Task Editor. If you have made changes, it will warn you and ask you if you want to save your changes or discard them.
Priorities Tab
The third tab on the Task Editor is the Priorities Tab.
You can also use priorities to manage your tasks. IdeasToDone provides four (4) different types of priorities – Importance, Urgency, Impact, and Effort. These priorities are not required. You might use only Importance or one of the other priority types for a task
Each priority type has six (6) levels of priority as follows:
Highest (Red)
Major (Orange)
Medium (Amber)
Some (Teal)
Low (Blue)
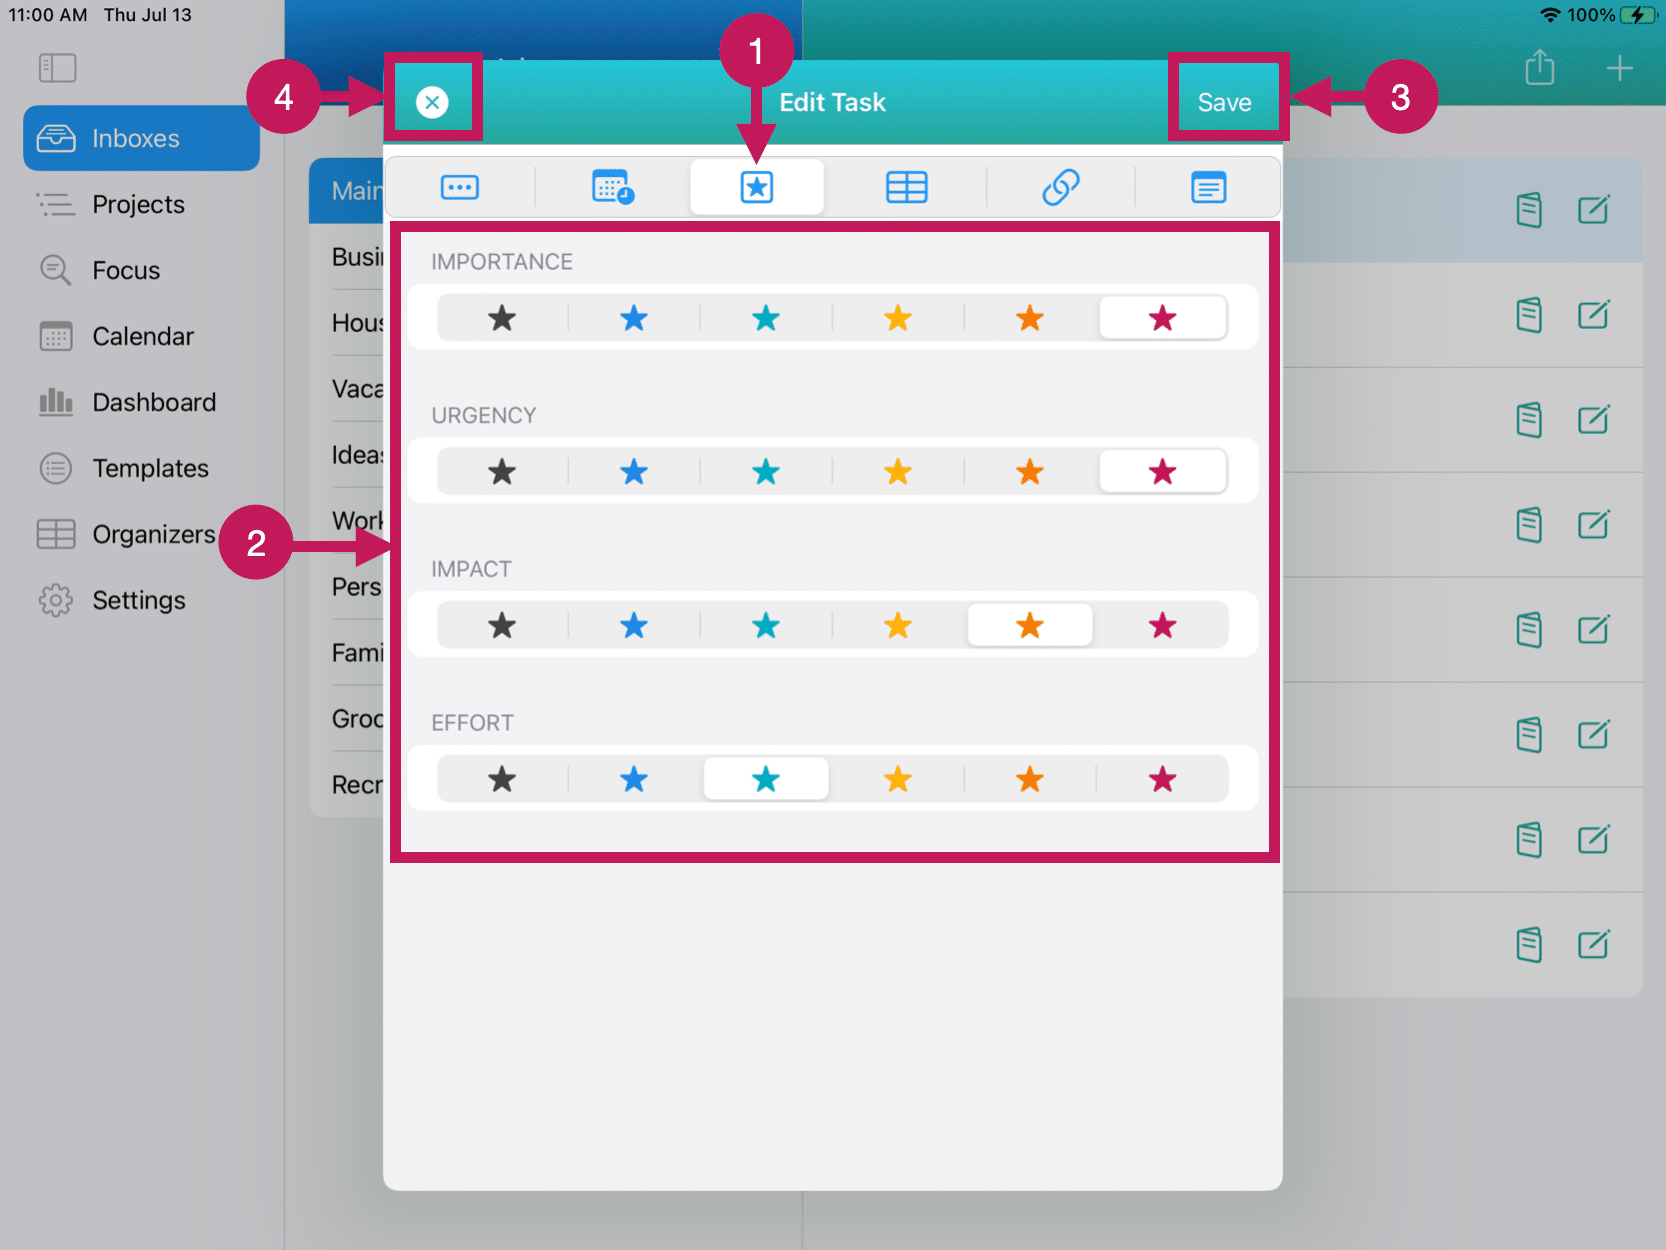
The following is a brief explanation of the numbered items from the Task Editor Priorities Tab graphic above:
1 – Priorities Tab:
Tap or click on this tab to bring this tab into view.
2 – Priorities Settings:
Tap or click on the priority level for any of the priority types you’d like to set. One simple tap or click for each priority type.
3 -Save Button: this button will save the changes you’ve made and close the Task Editor. You can also go to any of the other tabs to make additional changes before saving.
4 – Cancel: this button will cancel any changes you’ve made and return you to the previous View.
Organizers Tab
The 4th tab on the Edit Task Tab Bar is the Organizers Tab. There are nine (9) different categories of Task Organizers. These categories are optional but can be very helpful in organizing your tasks and improving your productivity.
The Task Organizer categories are Task Types, List Groups, Contexts, Locations, Task Status, Tags, Time Buckets, Scopes, and Personas.
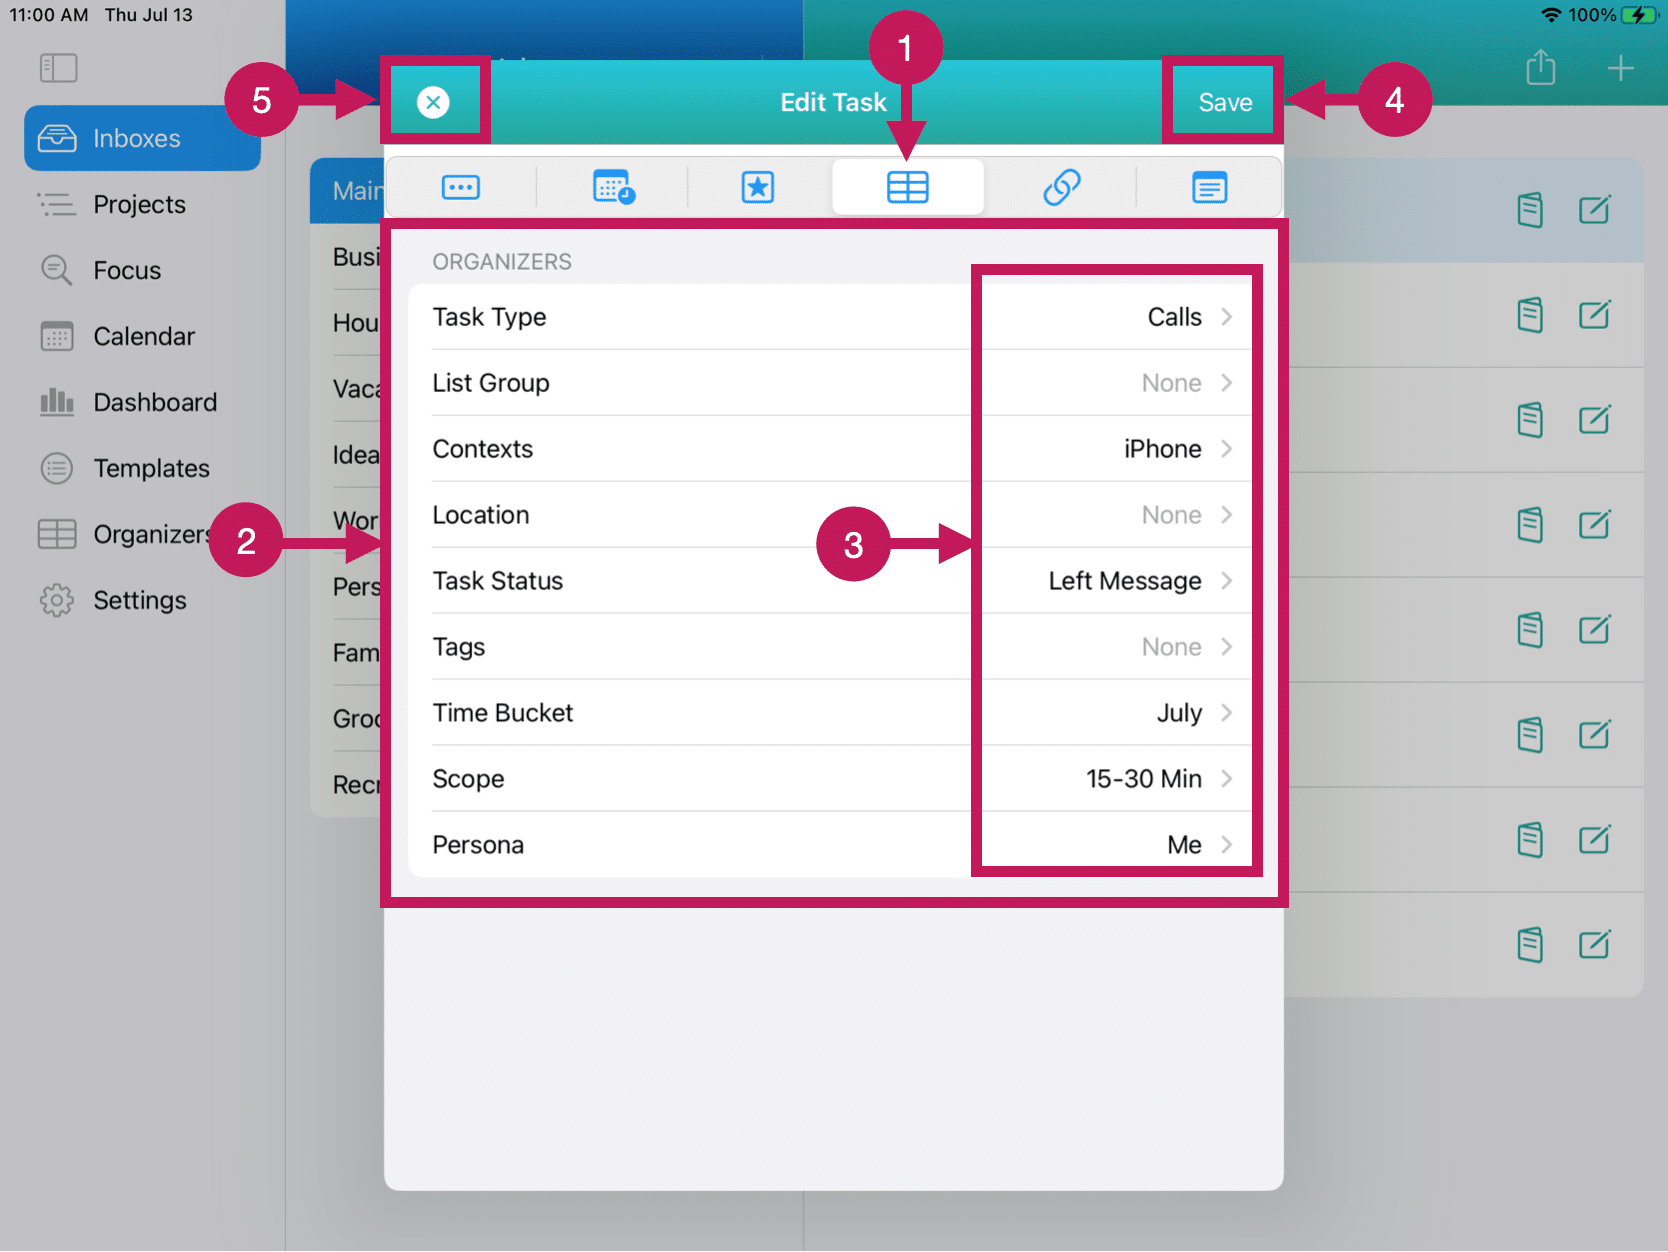
The following is a brief explanation of the numbered items from the Task Editor Organizers Tab graphic above:
1 – Organizers Tab:
Tap or click on this tab to bring this tab into view.
2 – Organizer Settings Section:
You can set or change any of the nine Organizer categories here. Tap or click anywhere on the row to select an Organizer to set.
3 – Current Organizer Settings:
The current organizer setting is displayed. If one is not set, you will see None in a dimmed state.
4 -Save Button: this button will save the changes you’ve made and close the Task Editor. You can also go to any of the other tabs to make additional changes before saving.
5 – Cancel: this button will cancel any changes you’ve made and return you to the previous View.
Organizer Selection Windows
When you select an Organizer category, you will choose a specific Organizer from the list of options that are presented. If the Organizer option you need has not been set up, you can add one of the fly.
Task Type
This task organizer will identify the task by the type of task it is. You can create as many Task Types as you’d like. A Task Type is required. You can set the Default for Task Type in the Organizers View.
Below are a few examples of Task Types:
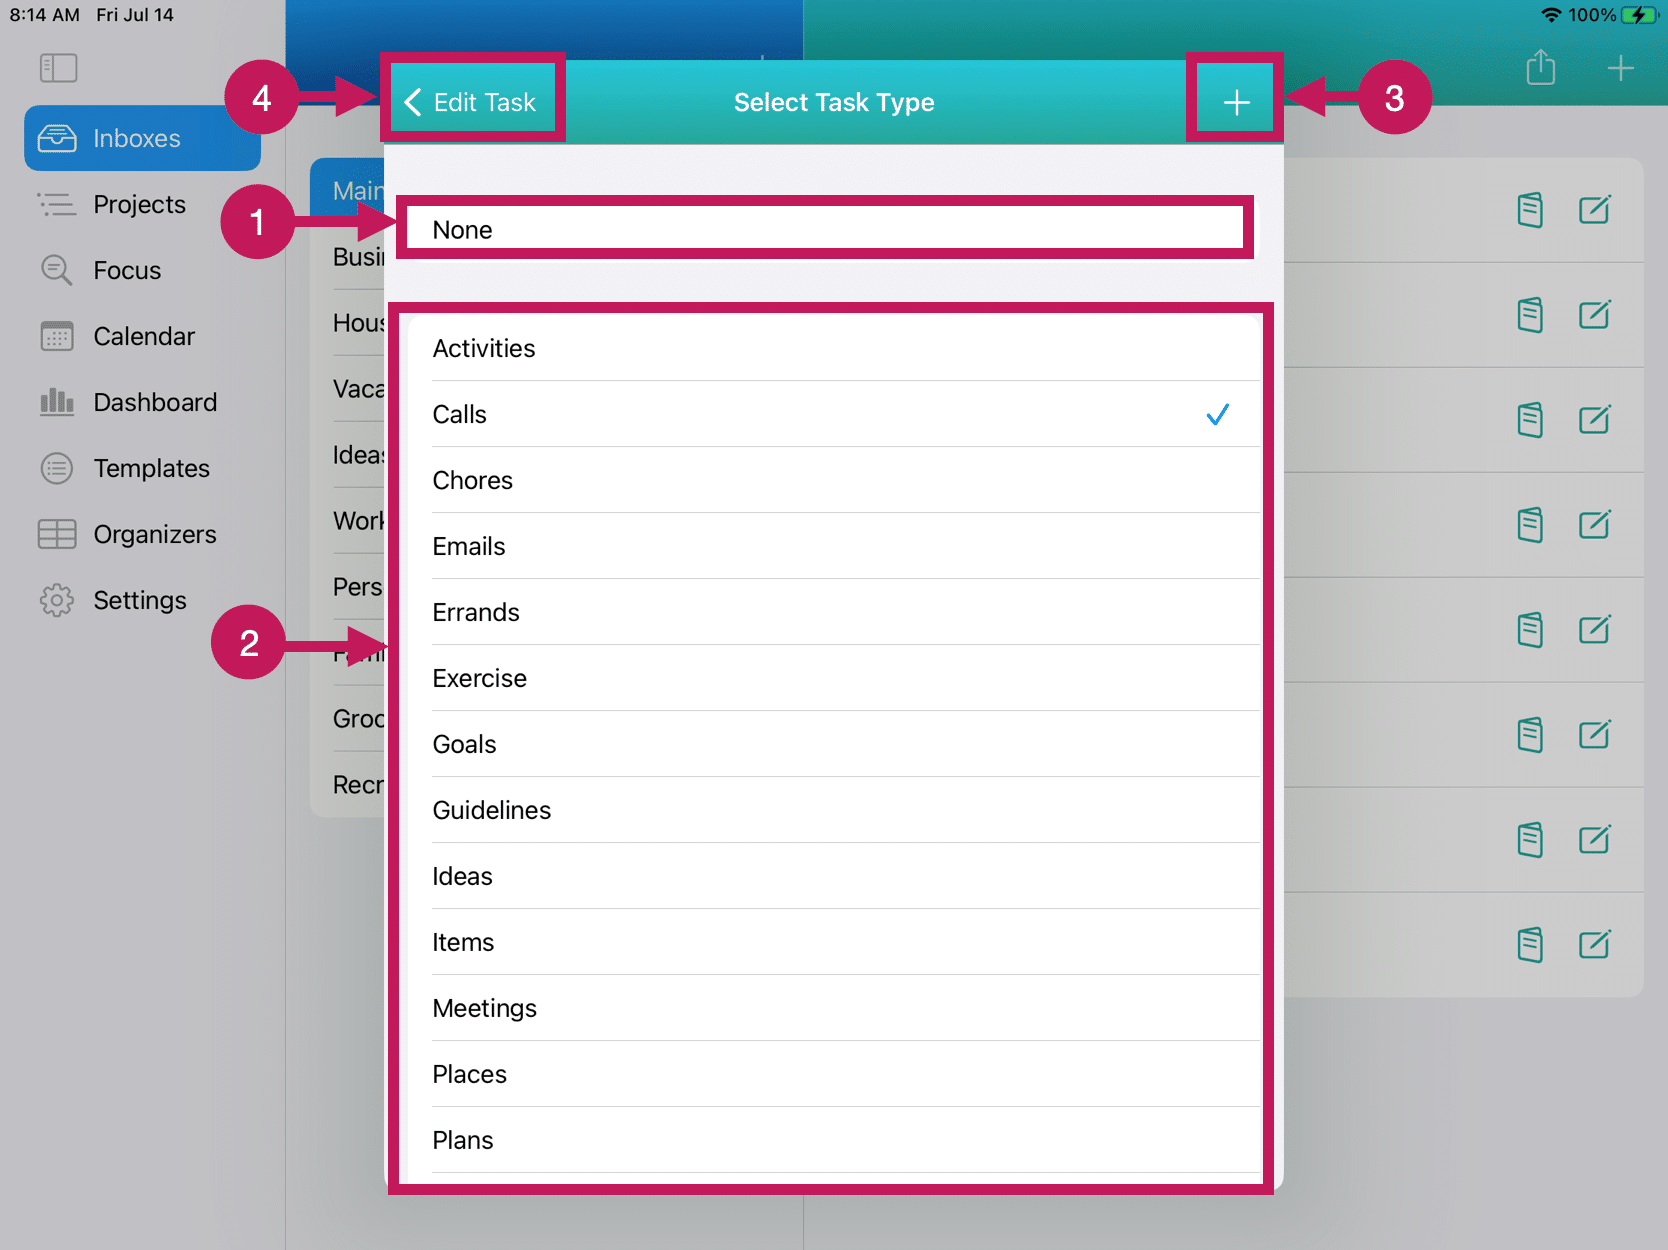
The following is a brief explanation of the numbered items from the Task Editor Task Type Selection graphic above. The description below pertains to any Organizer category except as noted below.
1 – None:
This option is used to change an organizer from a value to None. The only exception to this is for Task Type, which has an app-level default of Task Type.
2 – Organizer Settings Section:
You’ll be presented with a list of all the labels you have set up for that particular Organizer category. The labels that are listed in these screenshots are included for example purposes only. You can set up as many labels as you’d like for each Organizer category in the Organizers View. Refer To Step 3 for more information.
To select an Organizer from the list, just tap or click it.
3 – Add Button
The Add Button will let you create a new Organizer label for the Organizer category you are actively on. In the case above, you can add a new Task Type by tapping or clicking on the Add Button.
4 – Edit Task Button: this button will close the Select Task Type window and bring you back to the Organizers Tab in the Task Editor.
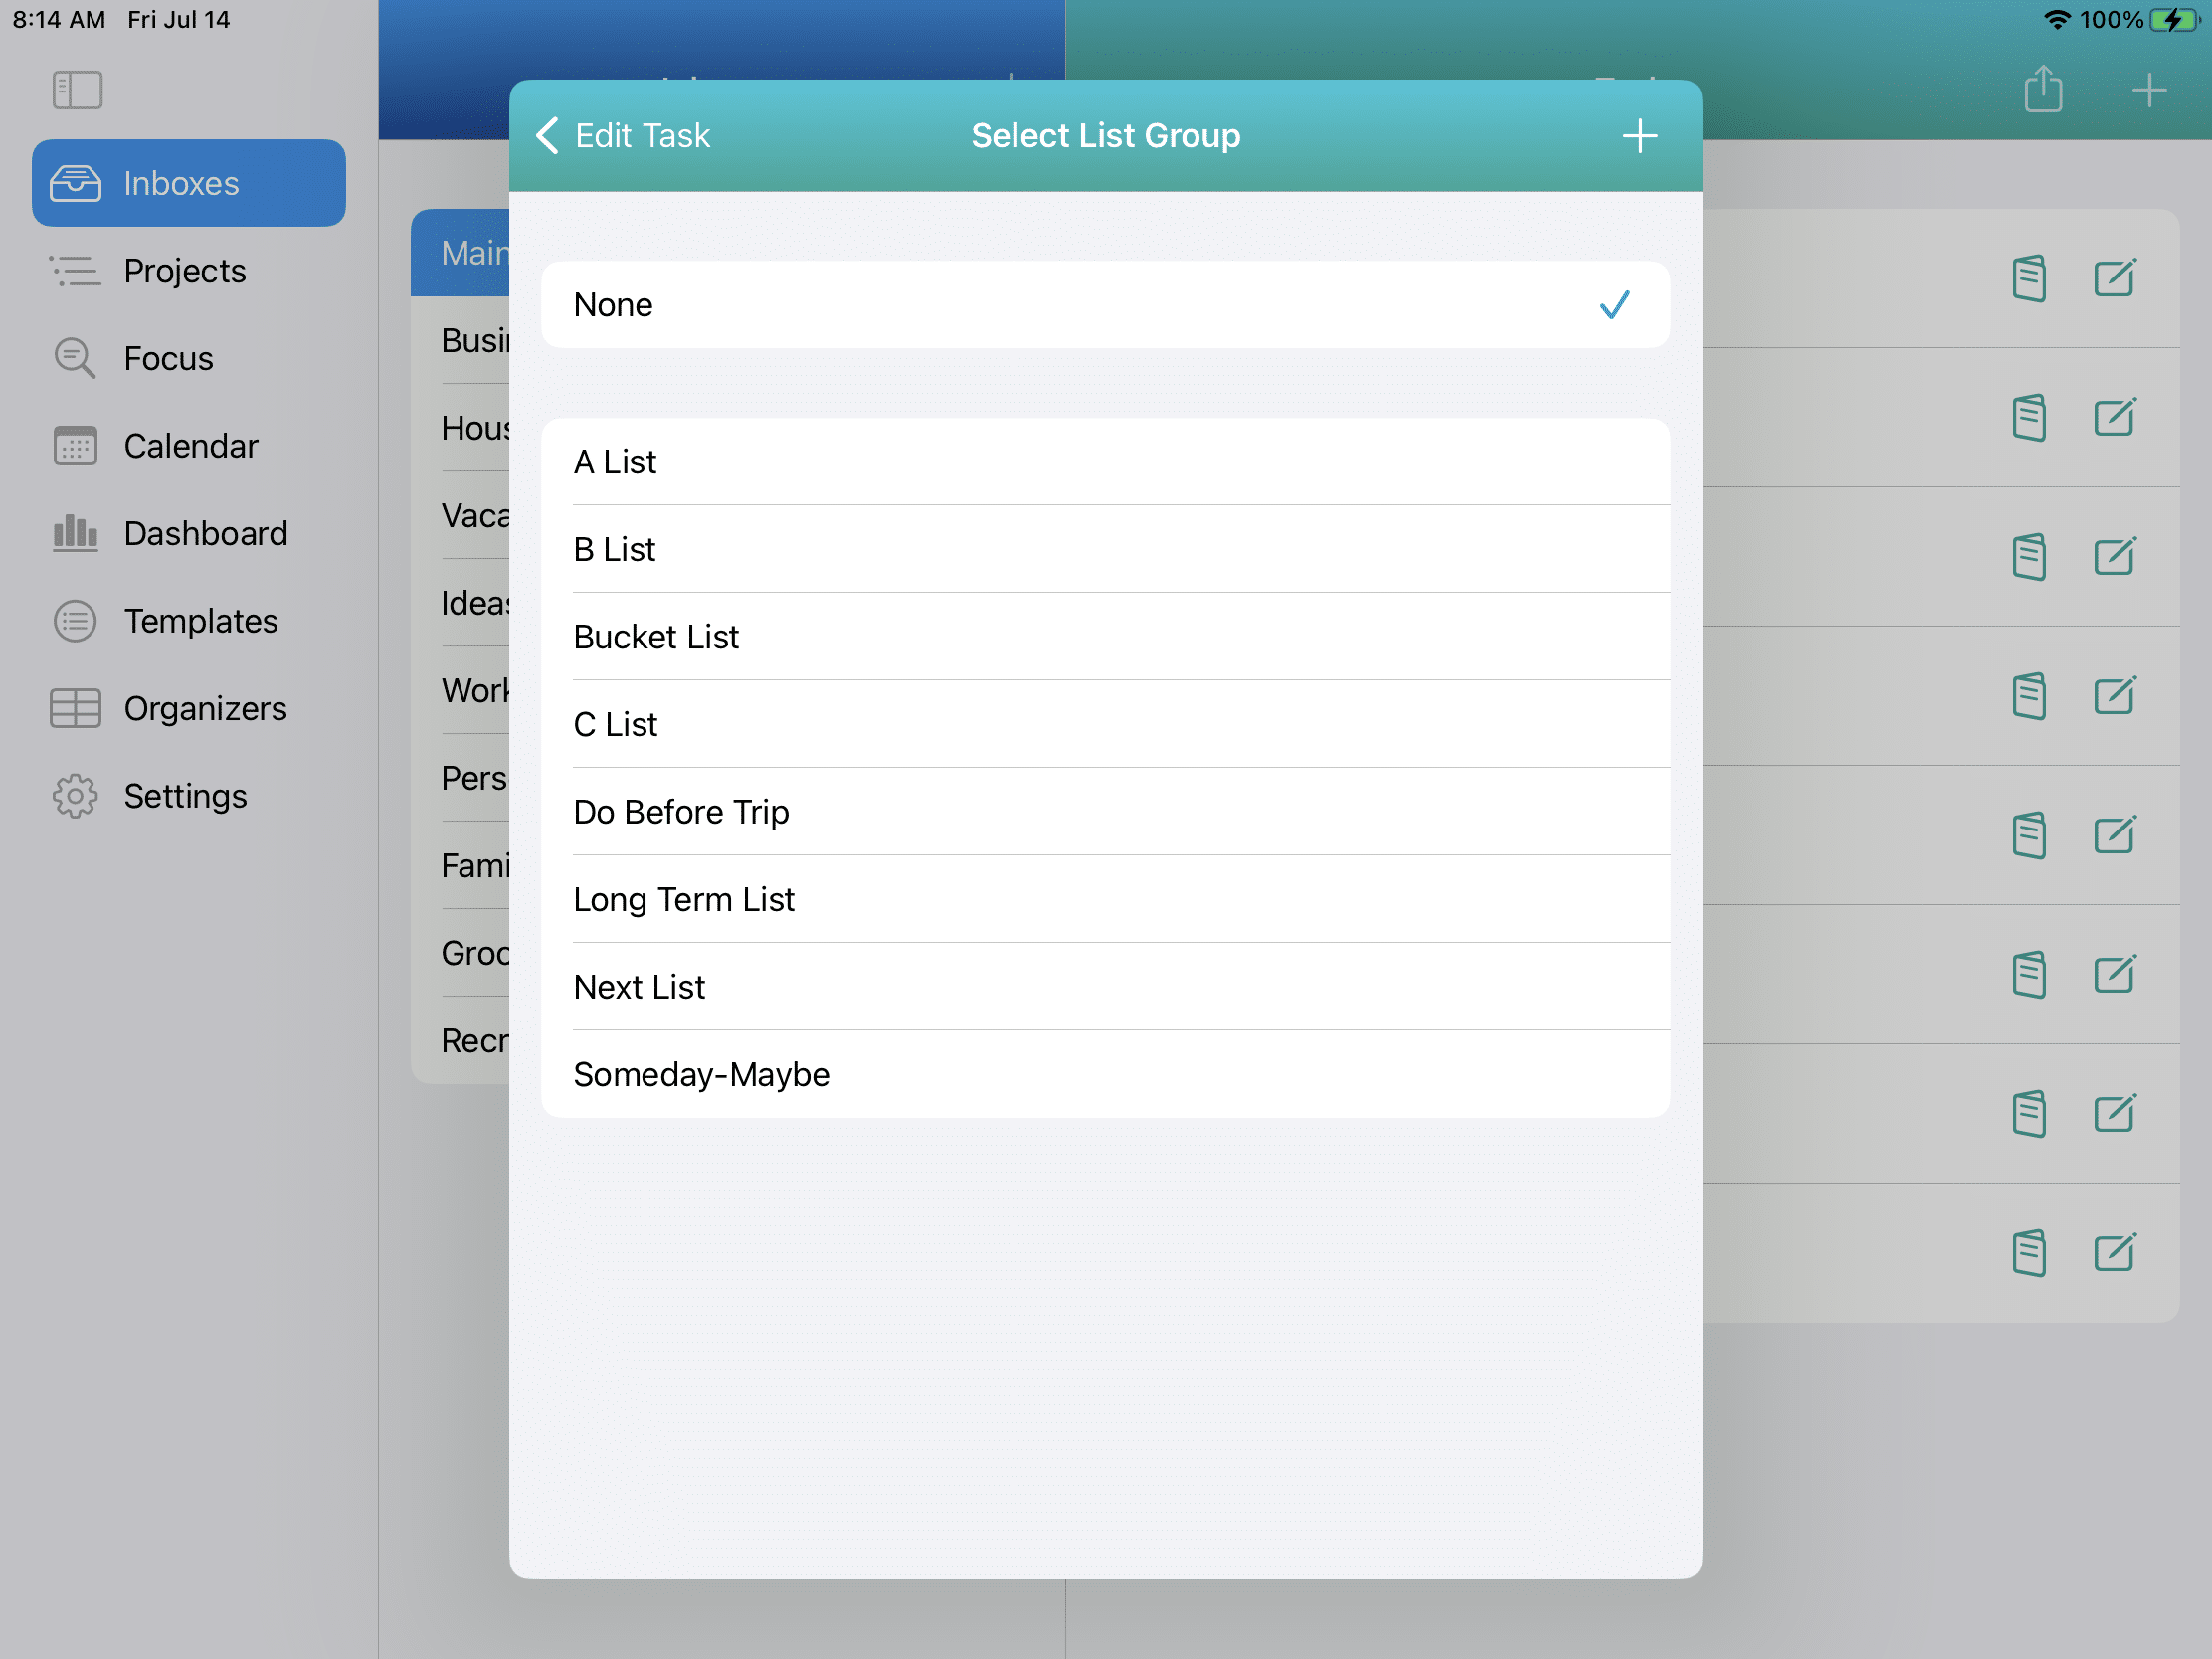
List Group
This Task Organizer is for custom List Groups you can create. You can set up as many List Groups as you need to help you organize and manage your tasks.
Examples you can set up are shown on the screenshot below:
Context
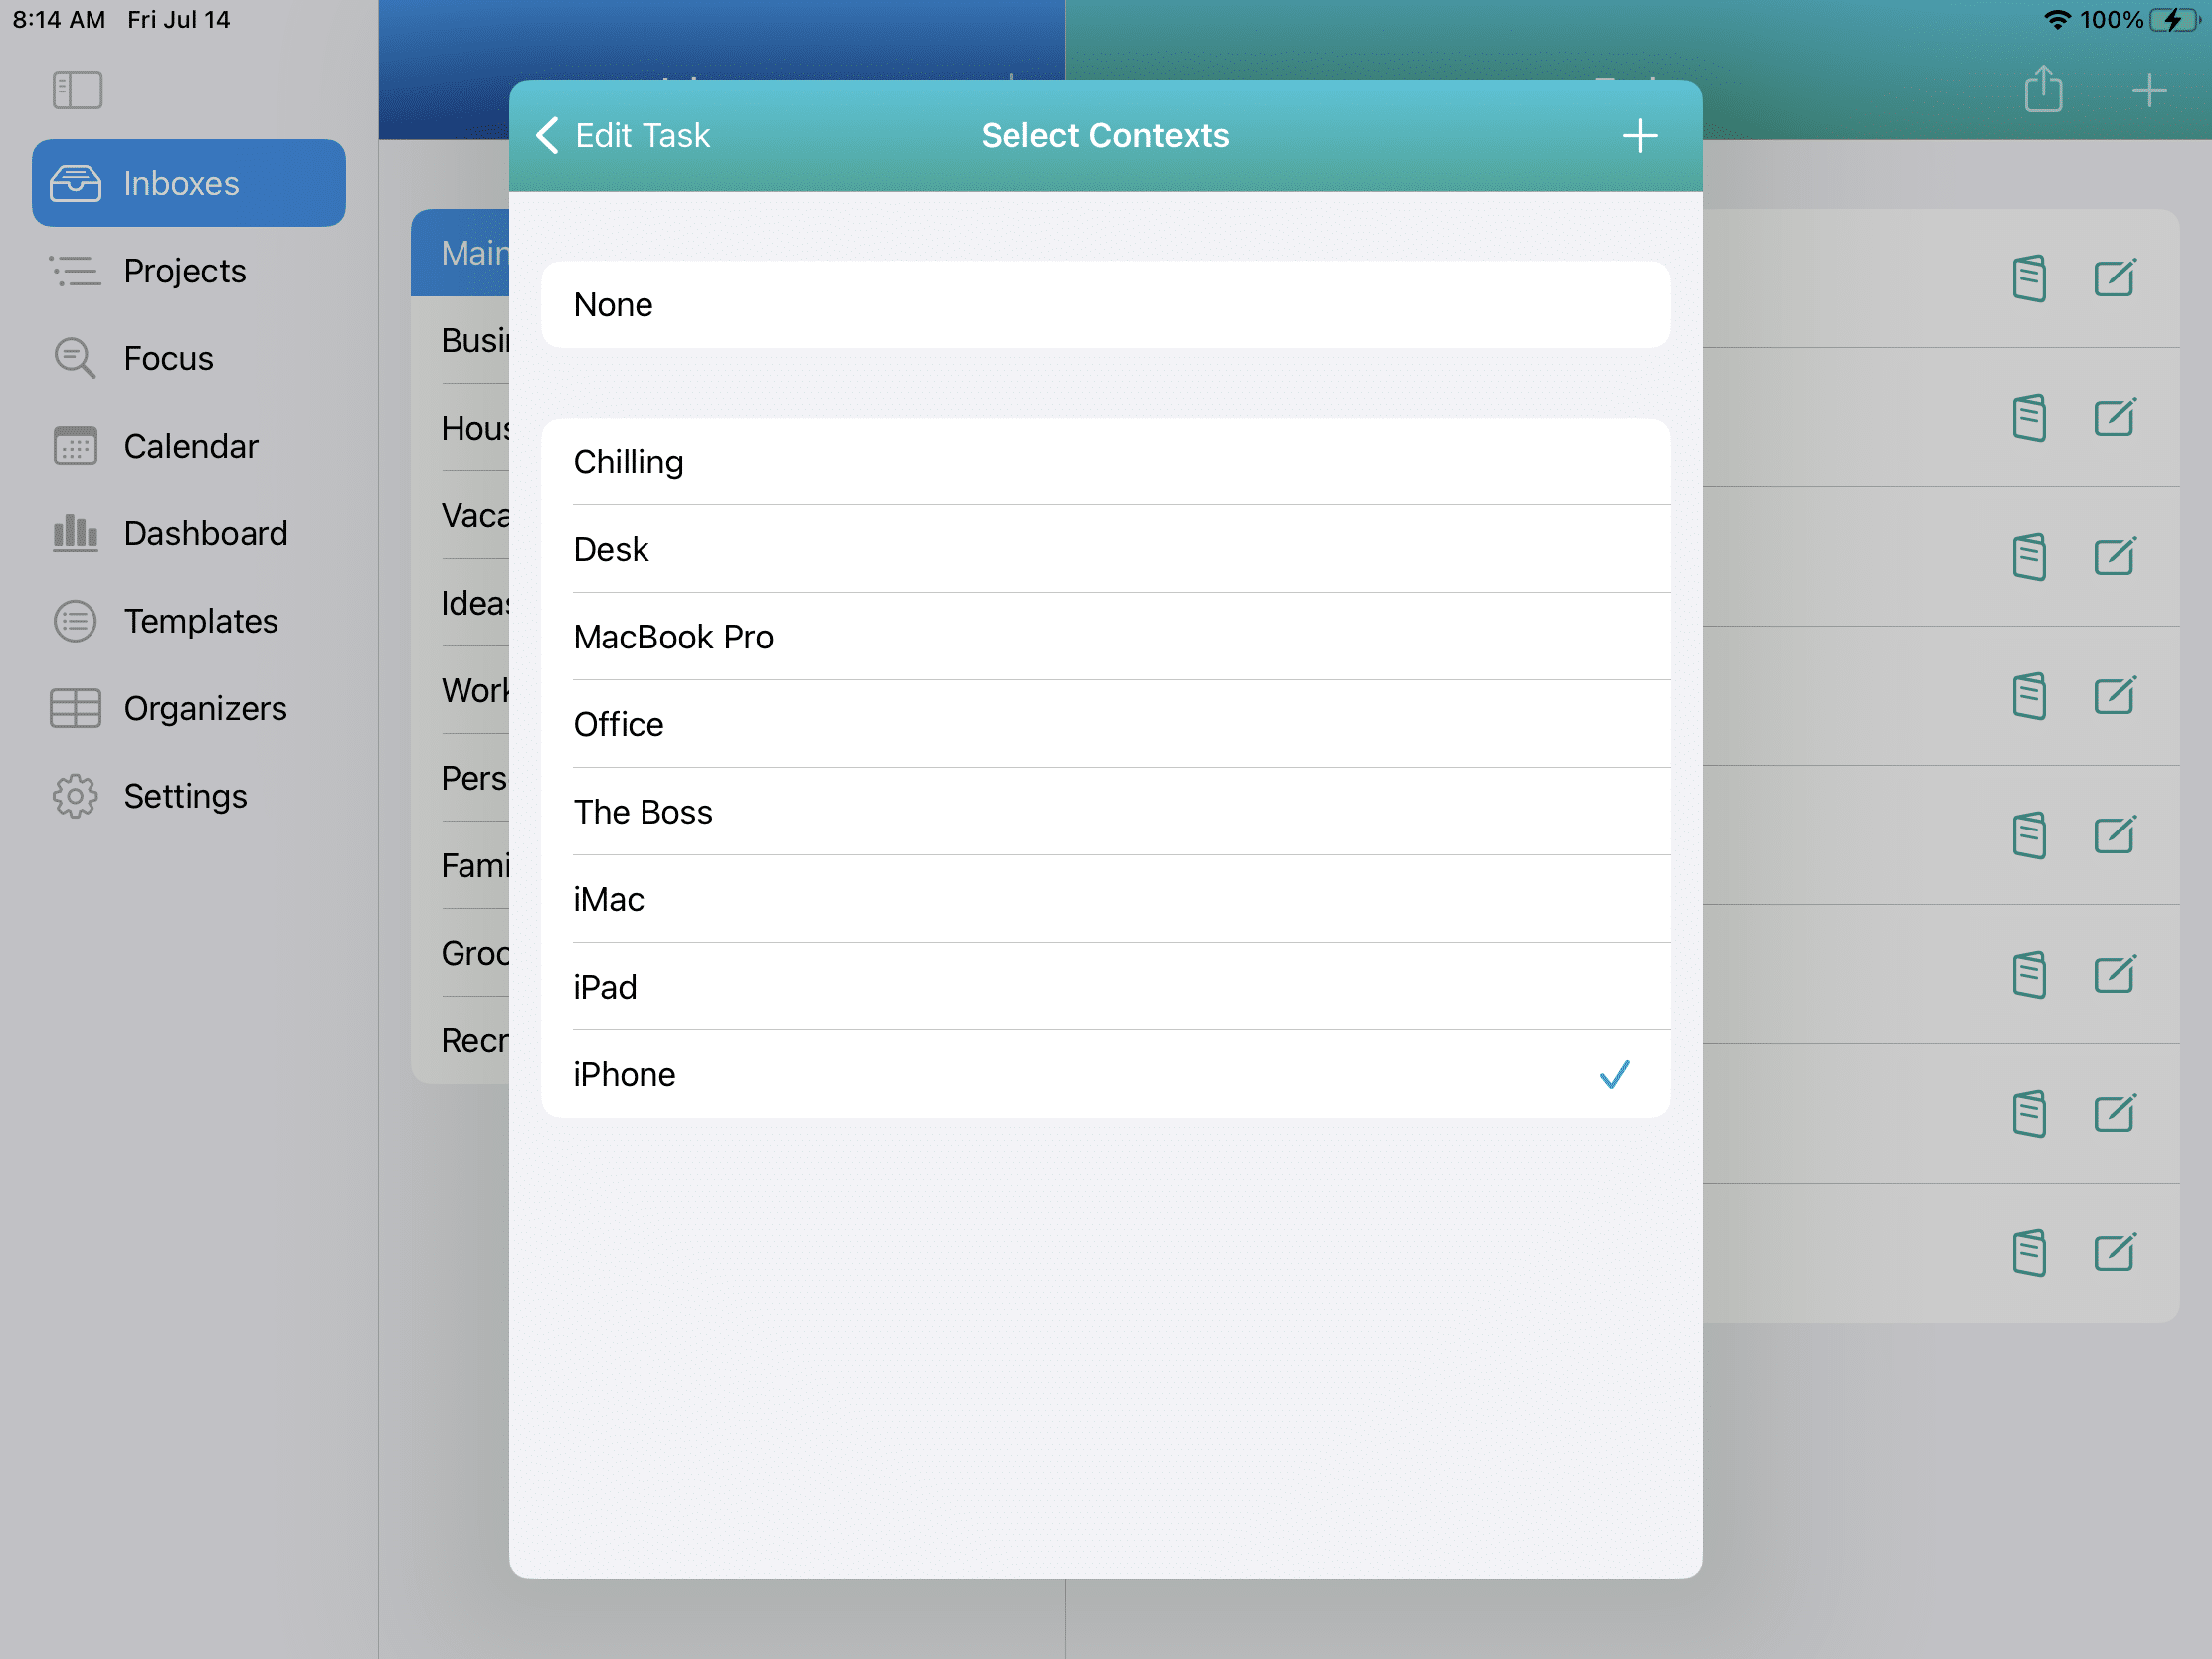
Contexts are another Organizer category you can set up labels for and then assign them to tasks. Contexts were popularized in David Allen’s Getting Things Done Methodology. Generally, these are places, things, tools, people, or conditions necessary to complete the task.
You can select more than one Context label for a task if appropriate.
Examples include:
Location
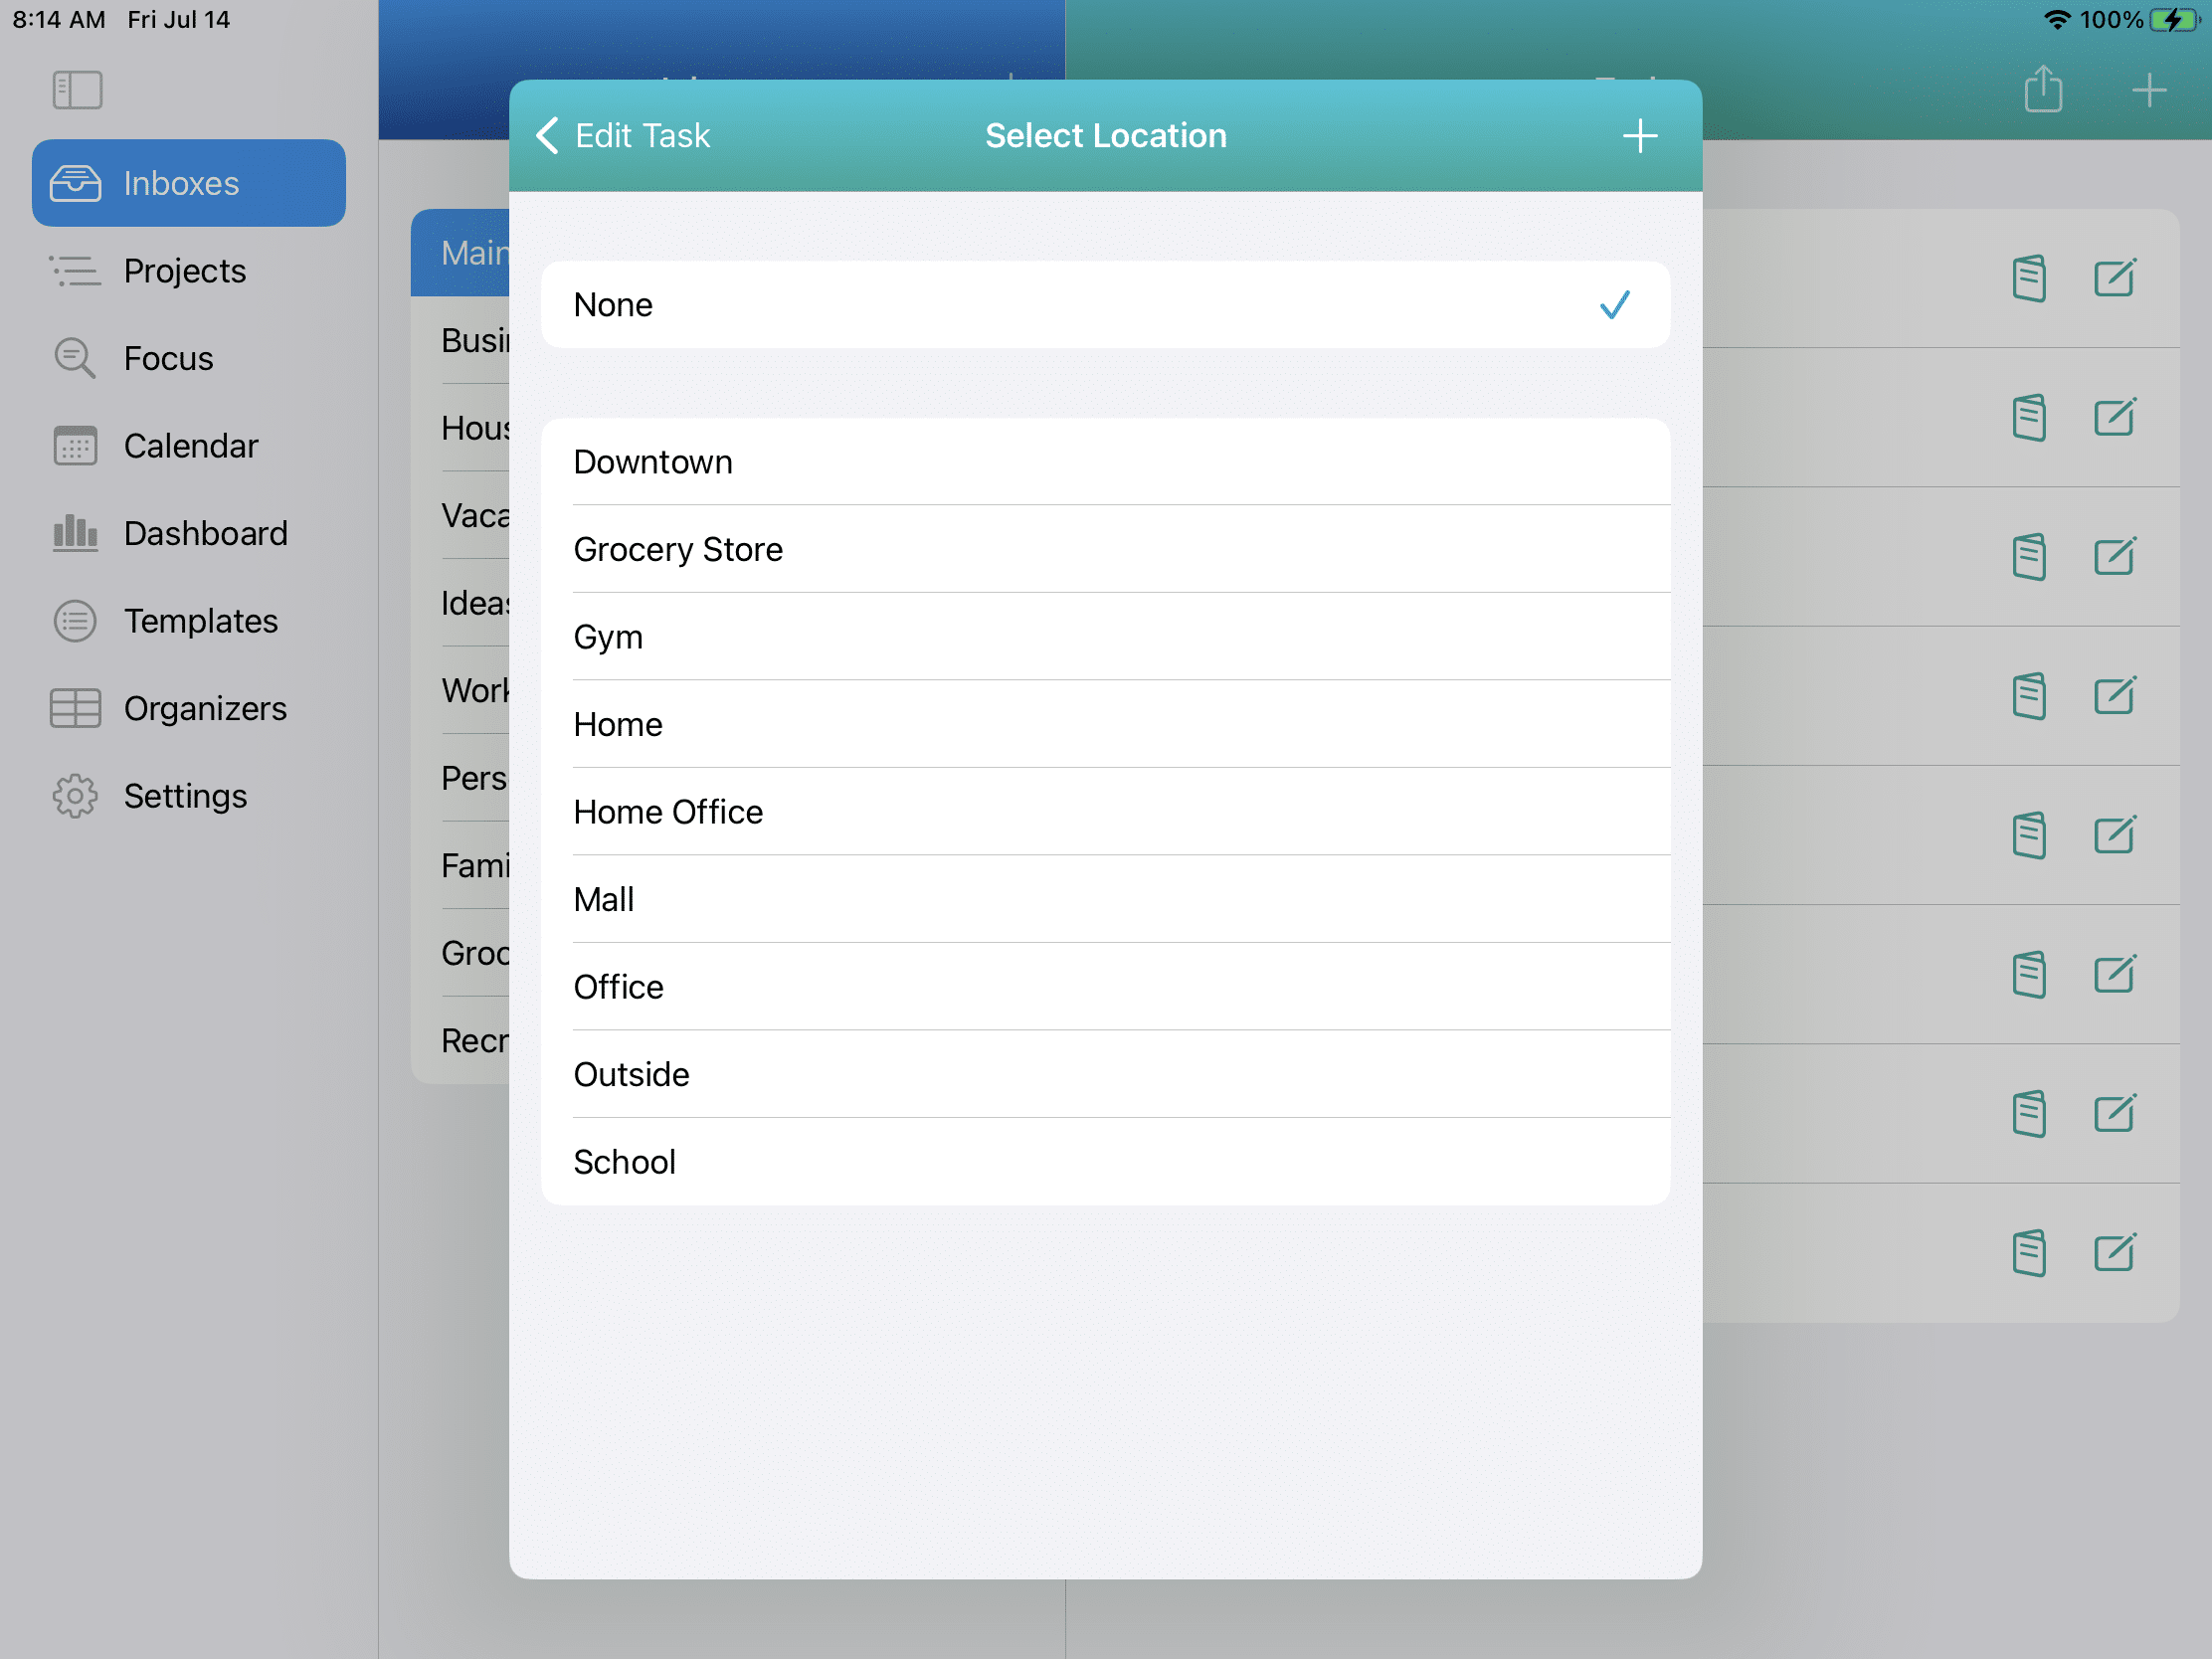
The next Organizer category is Location. This is the location where the task will take place, such as an office, a store, a place, your home, etc.
You can create as many locations as you need.
Examples include:
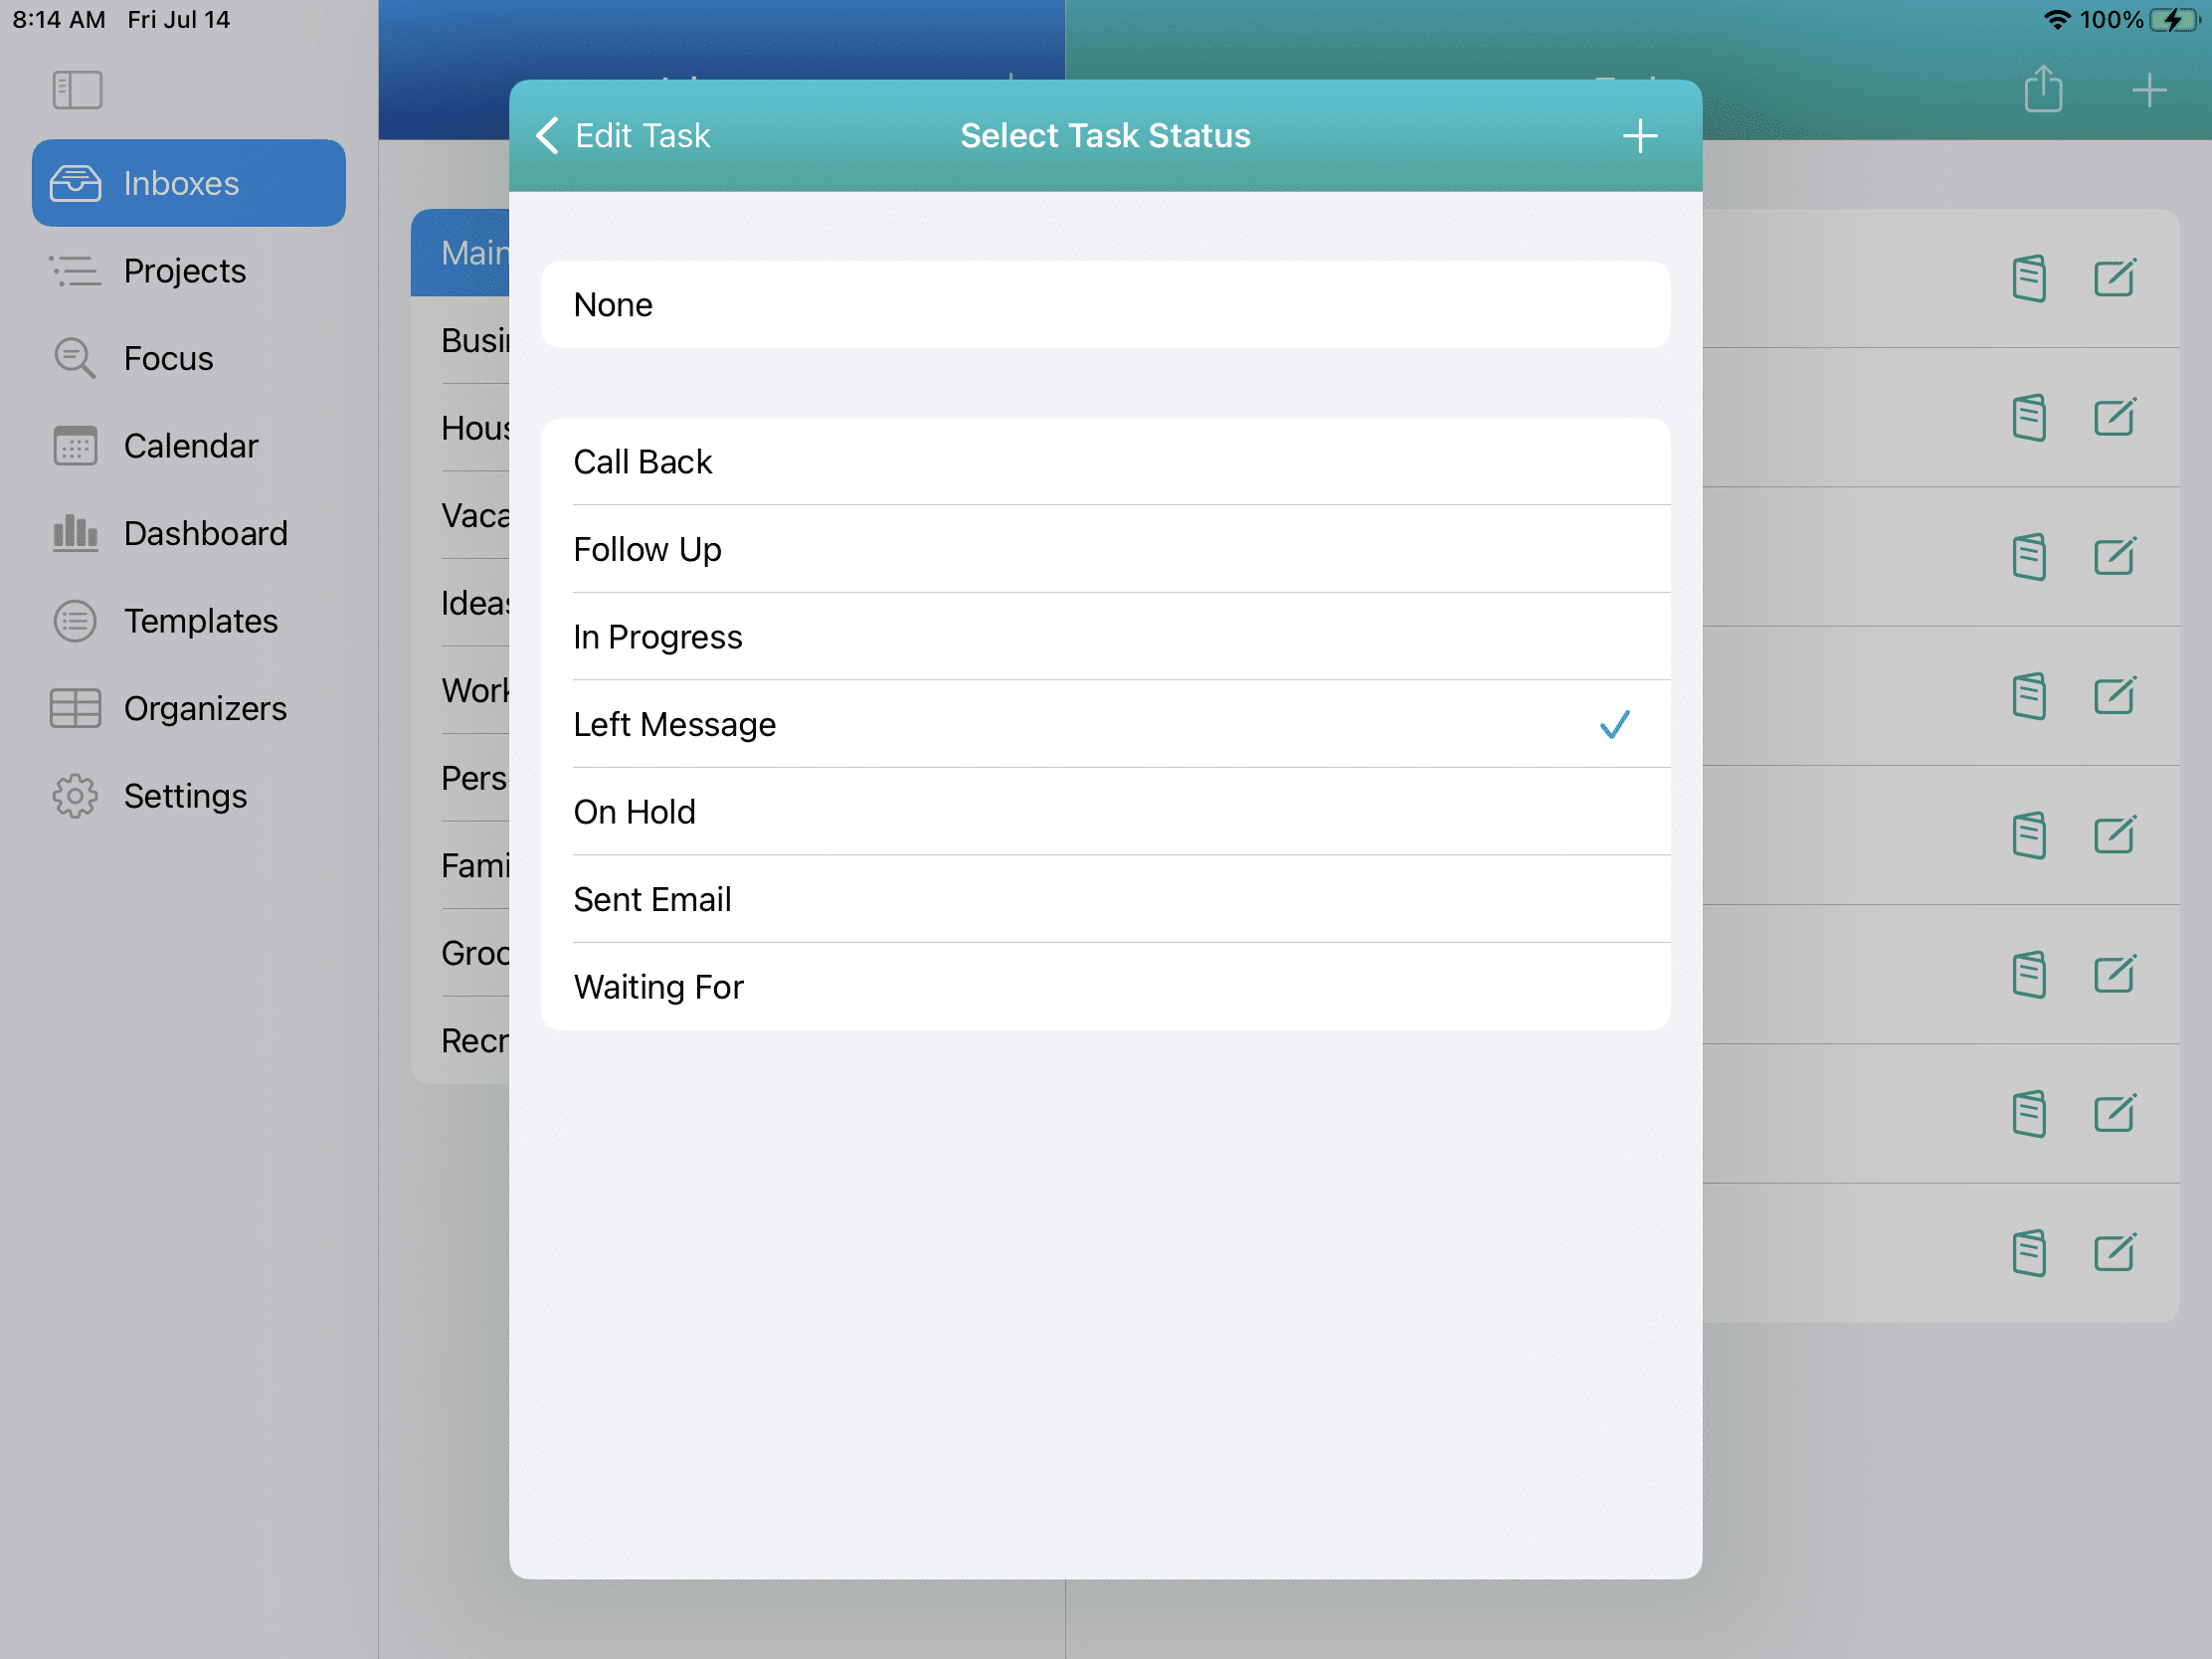
Task Status
The next Organizer category is Task Status. This refers to the status of a particular task.
Examples include:
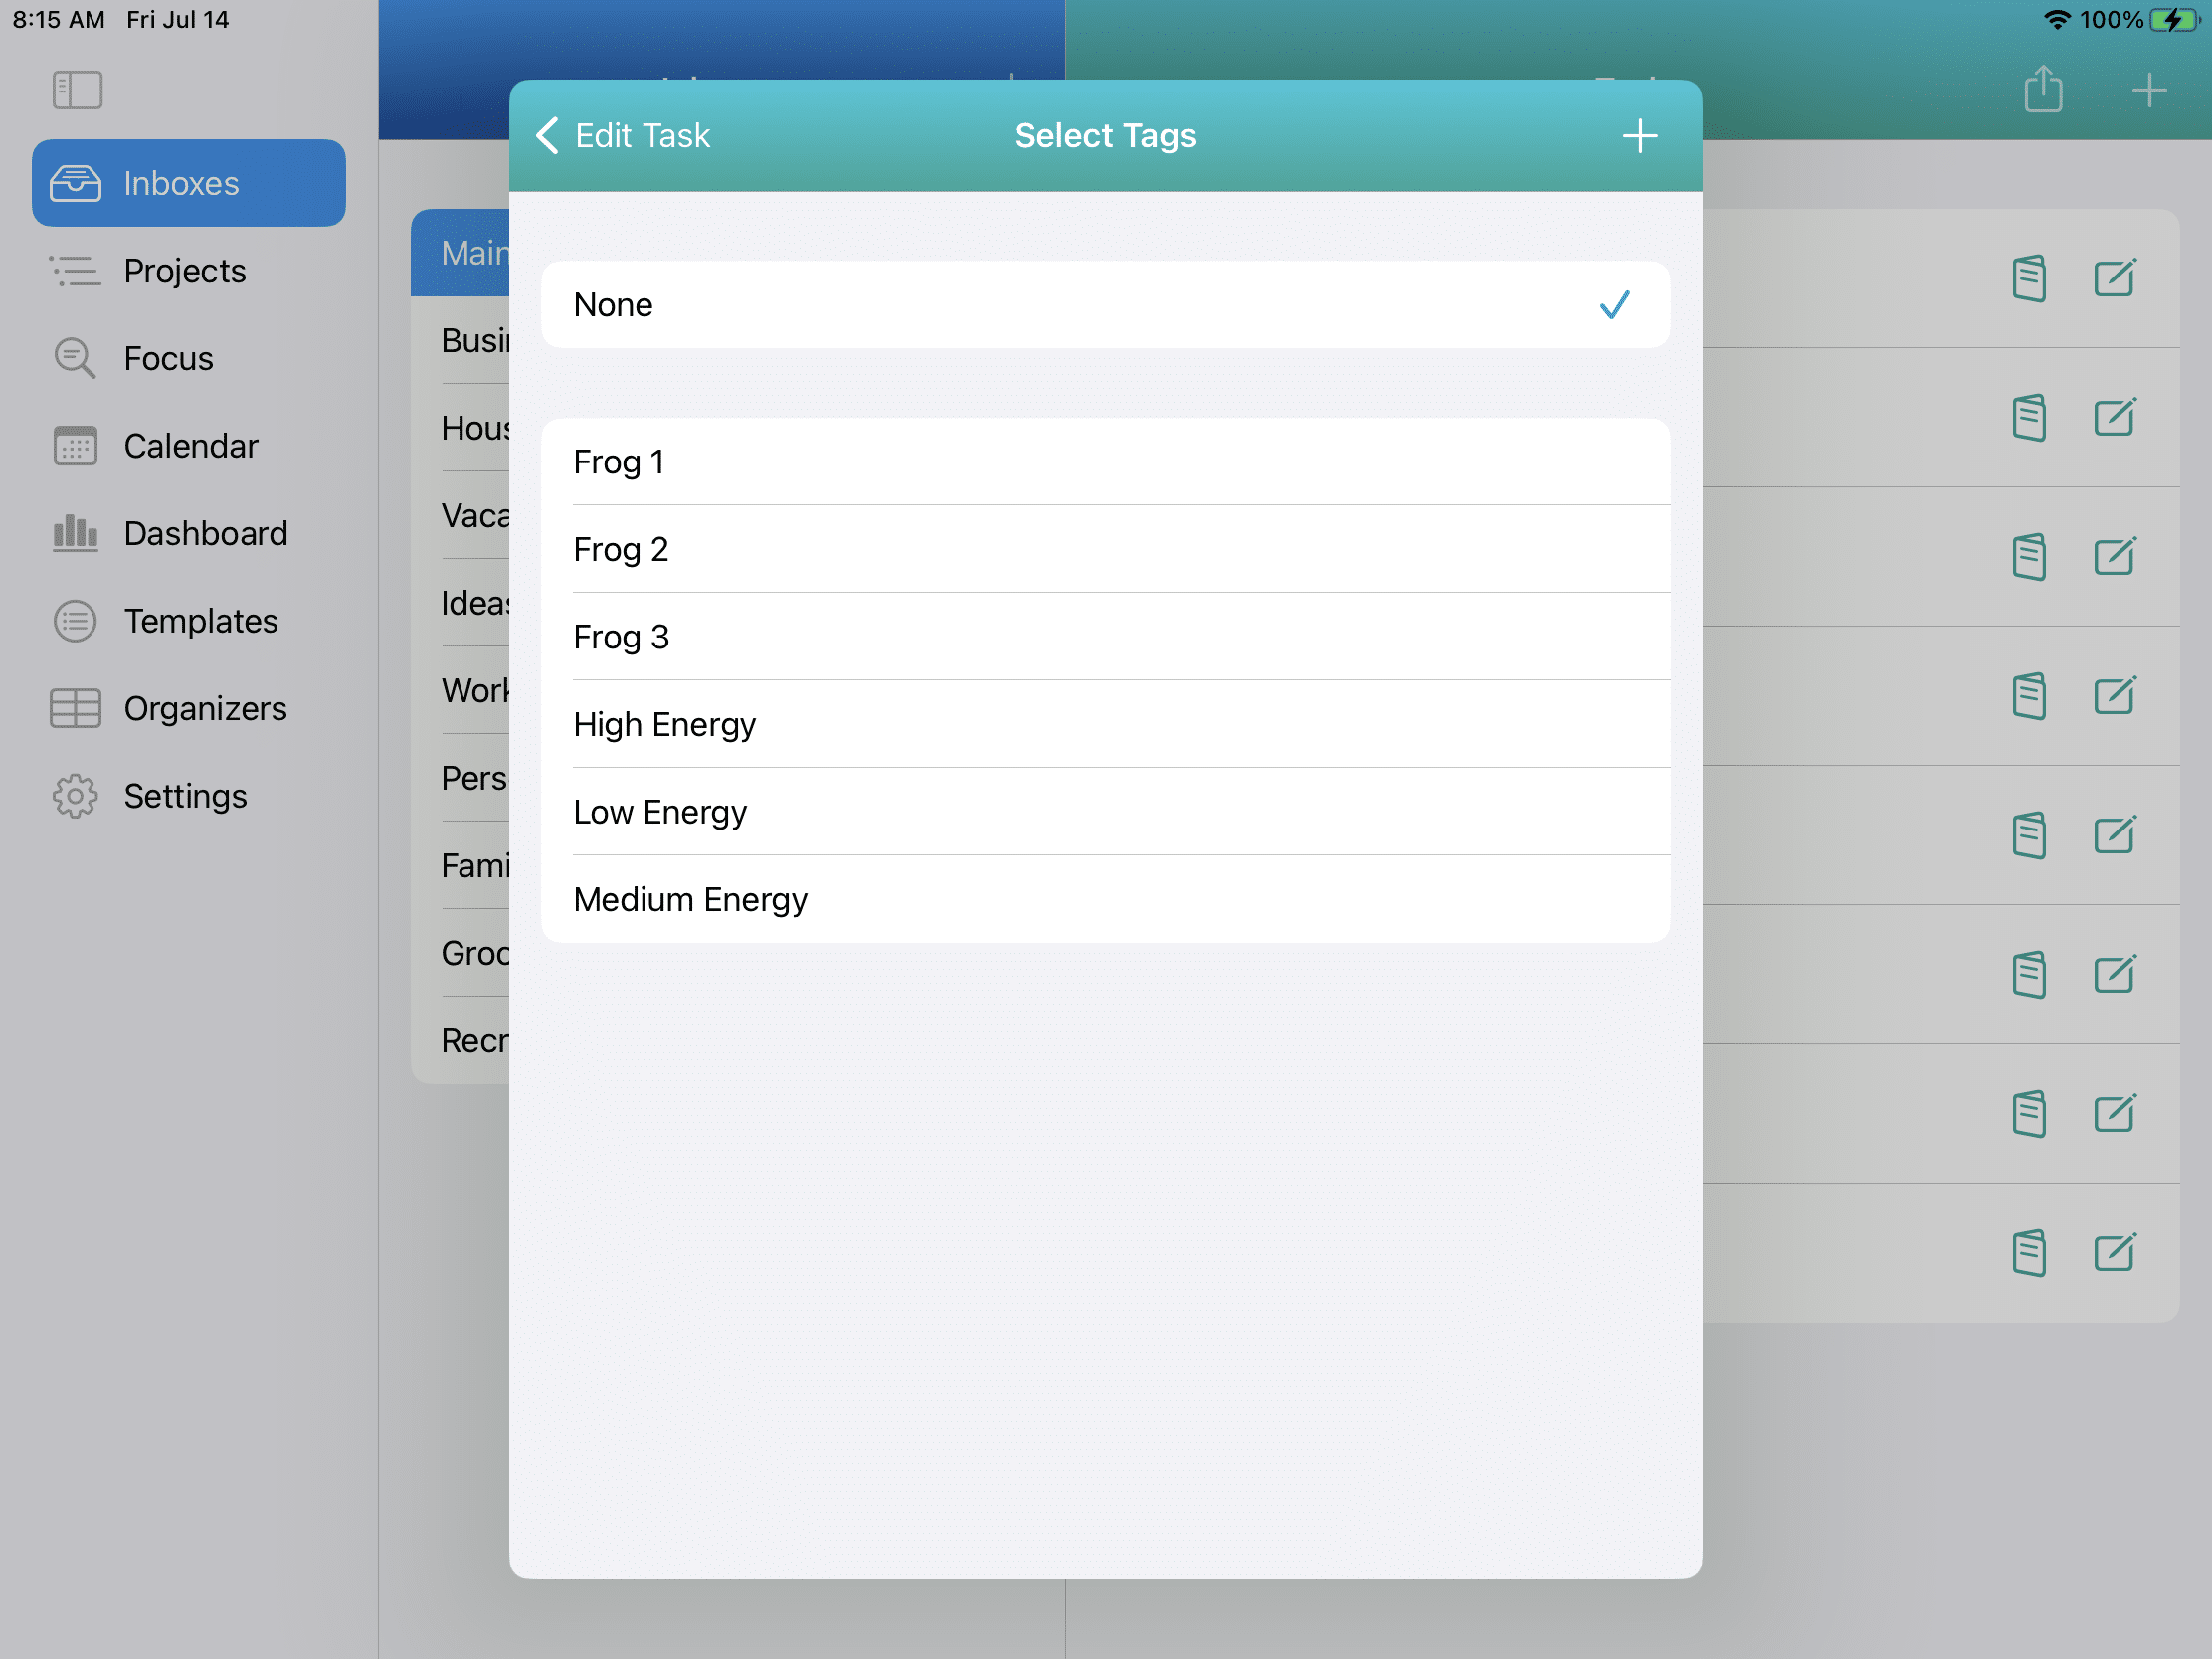
Tags
You can create as many tags per task as you’d like.
Tags are entirely custom and are an excellent way to identify or group tasks.
You can assign more than one tag to a task.
Some examples are shown below:
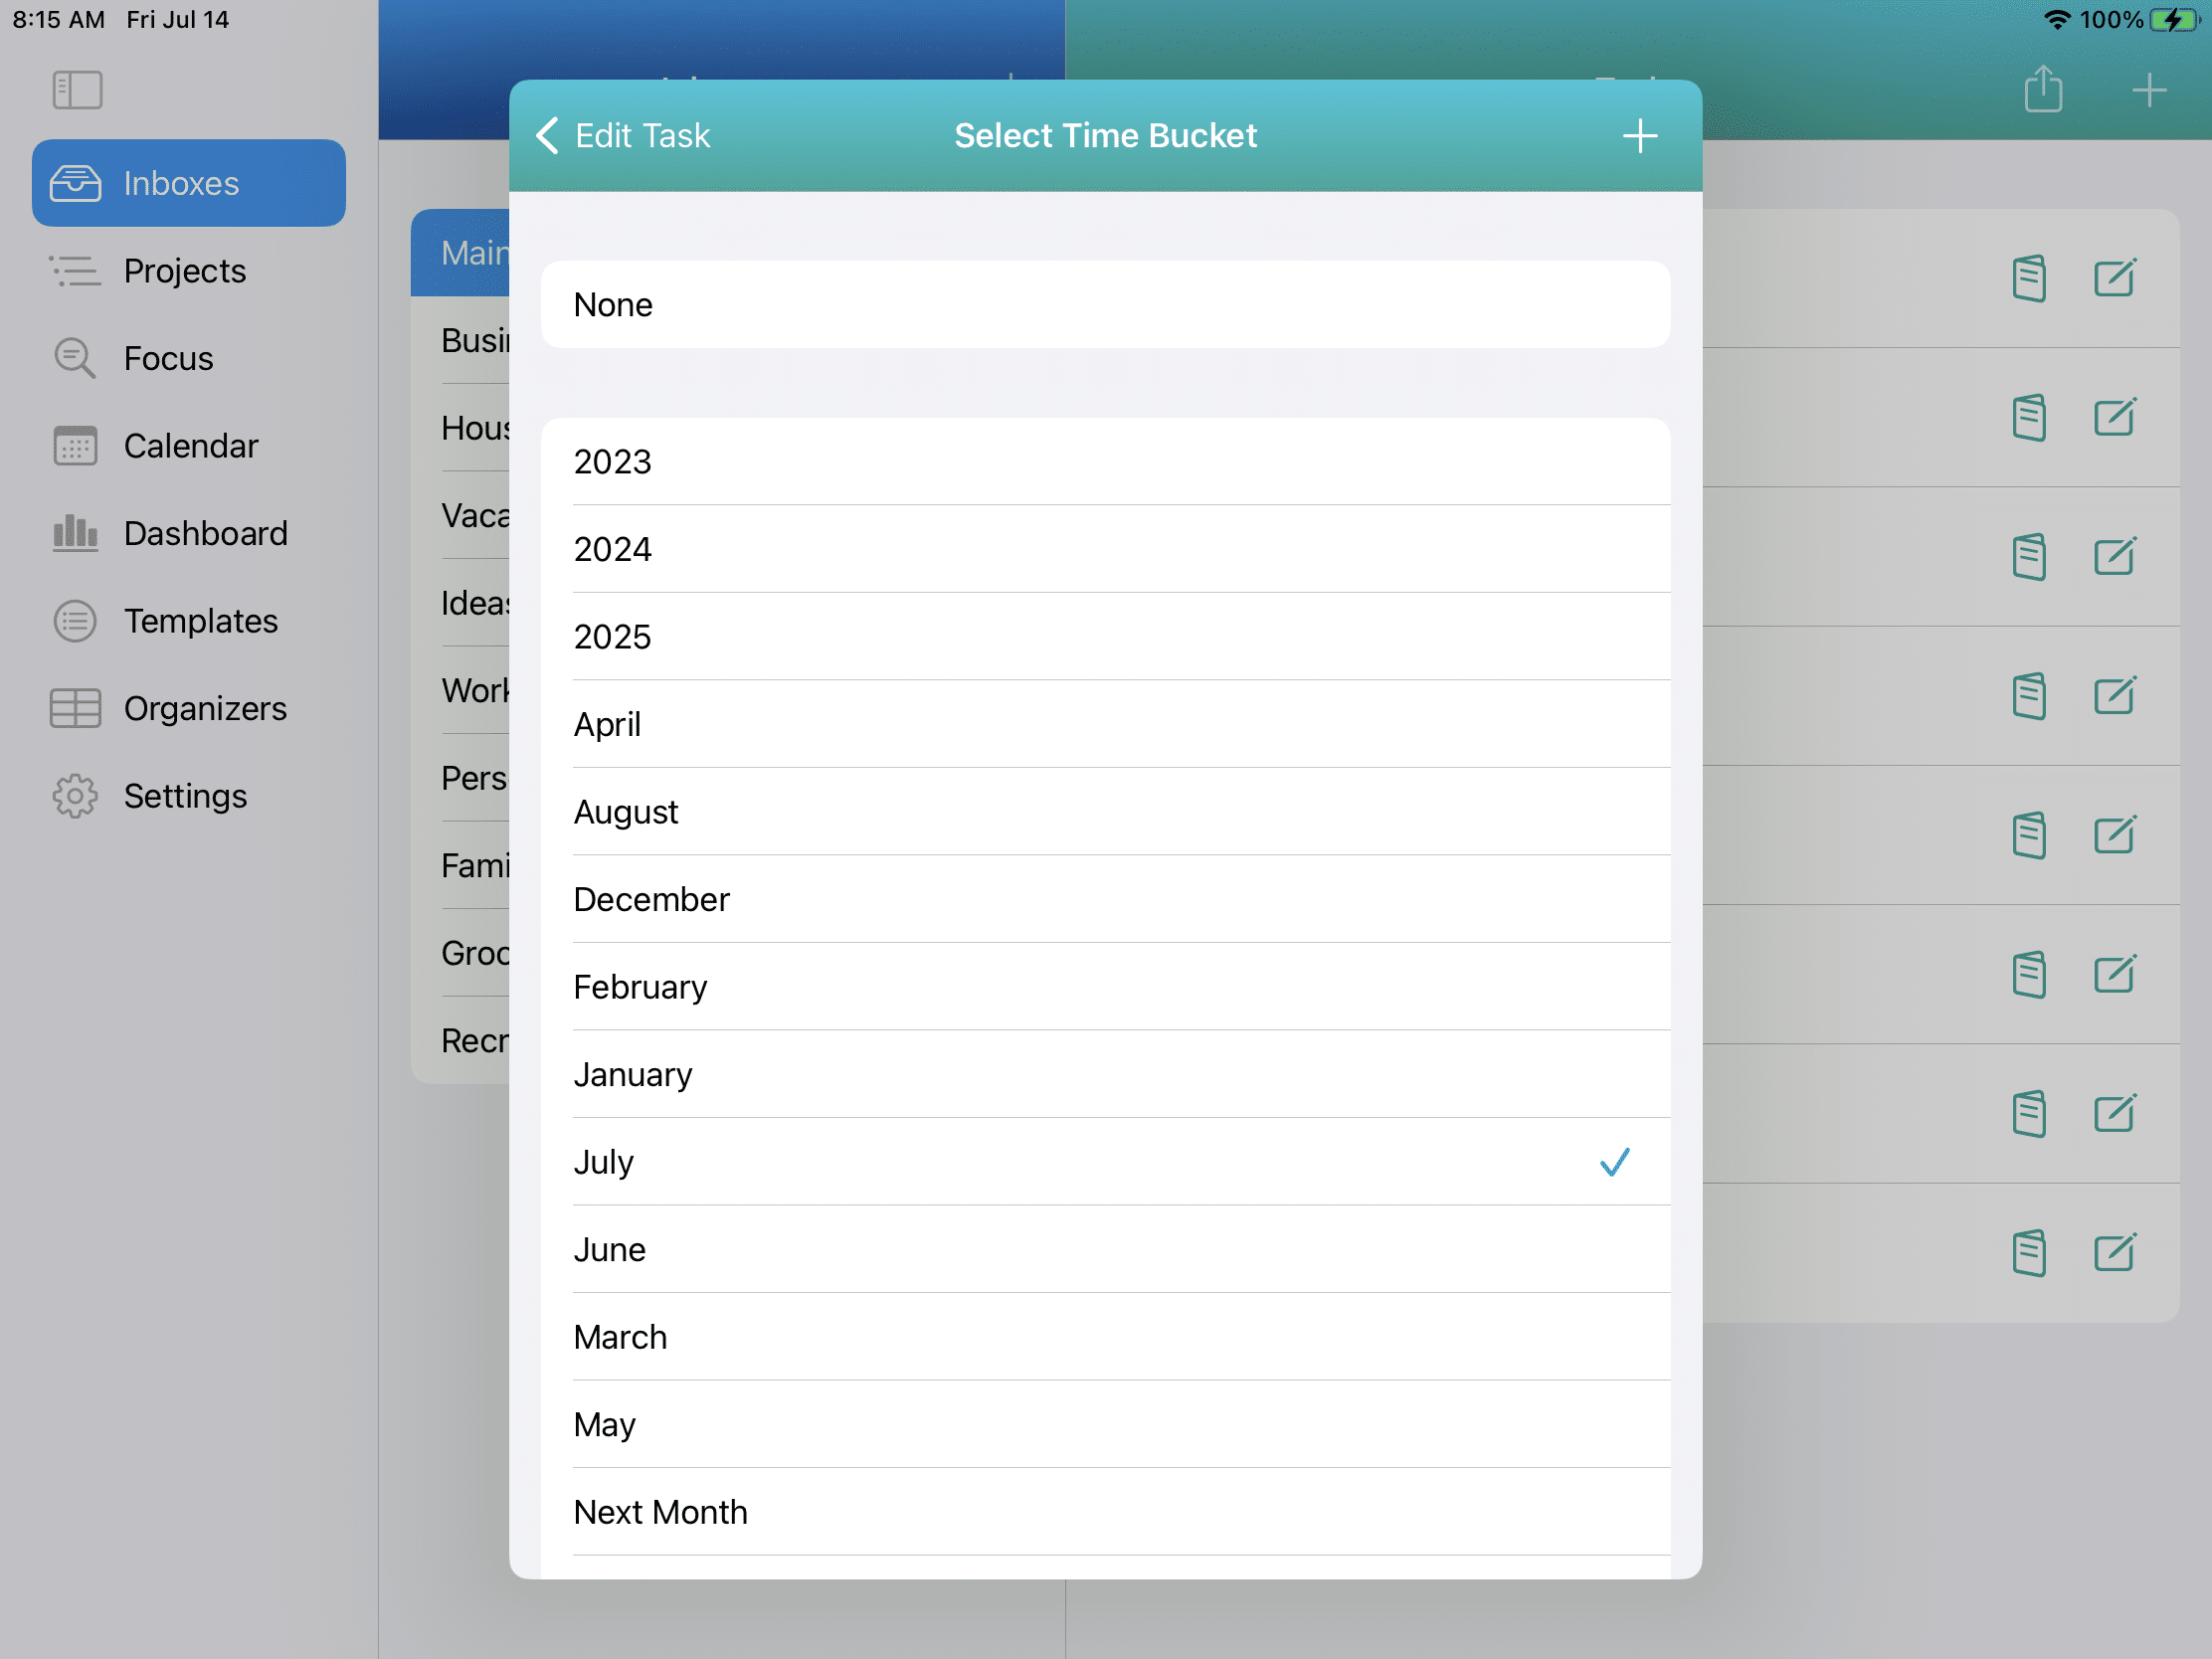
Time Buckets
The next Organizer category is Time Buckets. You can assign a Time Bucket to a task to assist in task staging. Task Staging is great when it is too soon to assign a specific date to a task, and you don’t want to put it in a Someday/Maybe List. So instead, you can put it into a Time Bucket for later review and scheduling.
You can set up Time Buckets for months of the year, each quarter, or the next couple of years.
Examples of Time Buckets are shown below:
Scopes
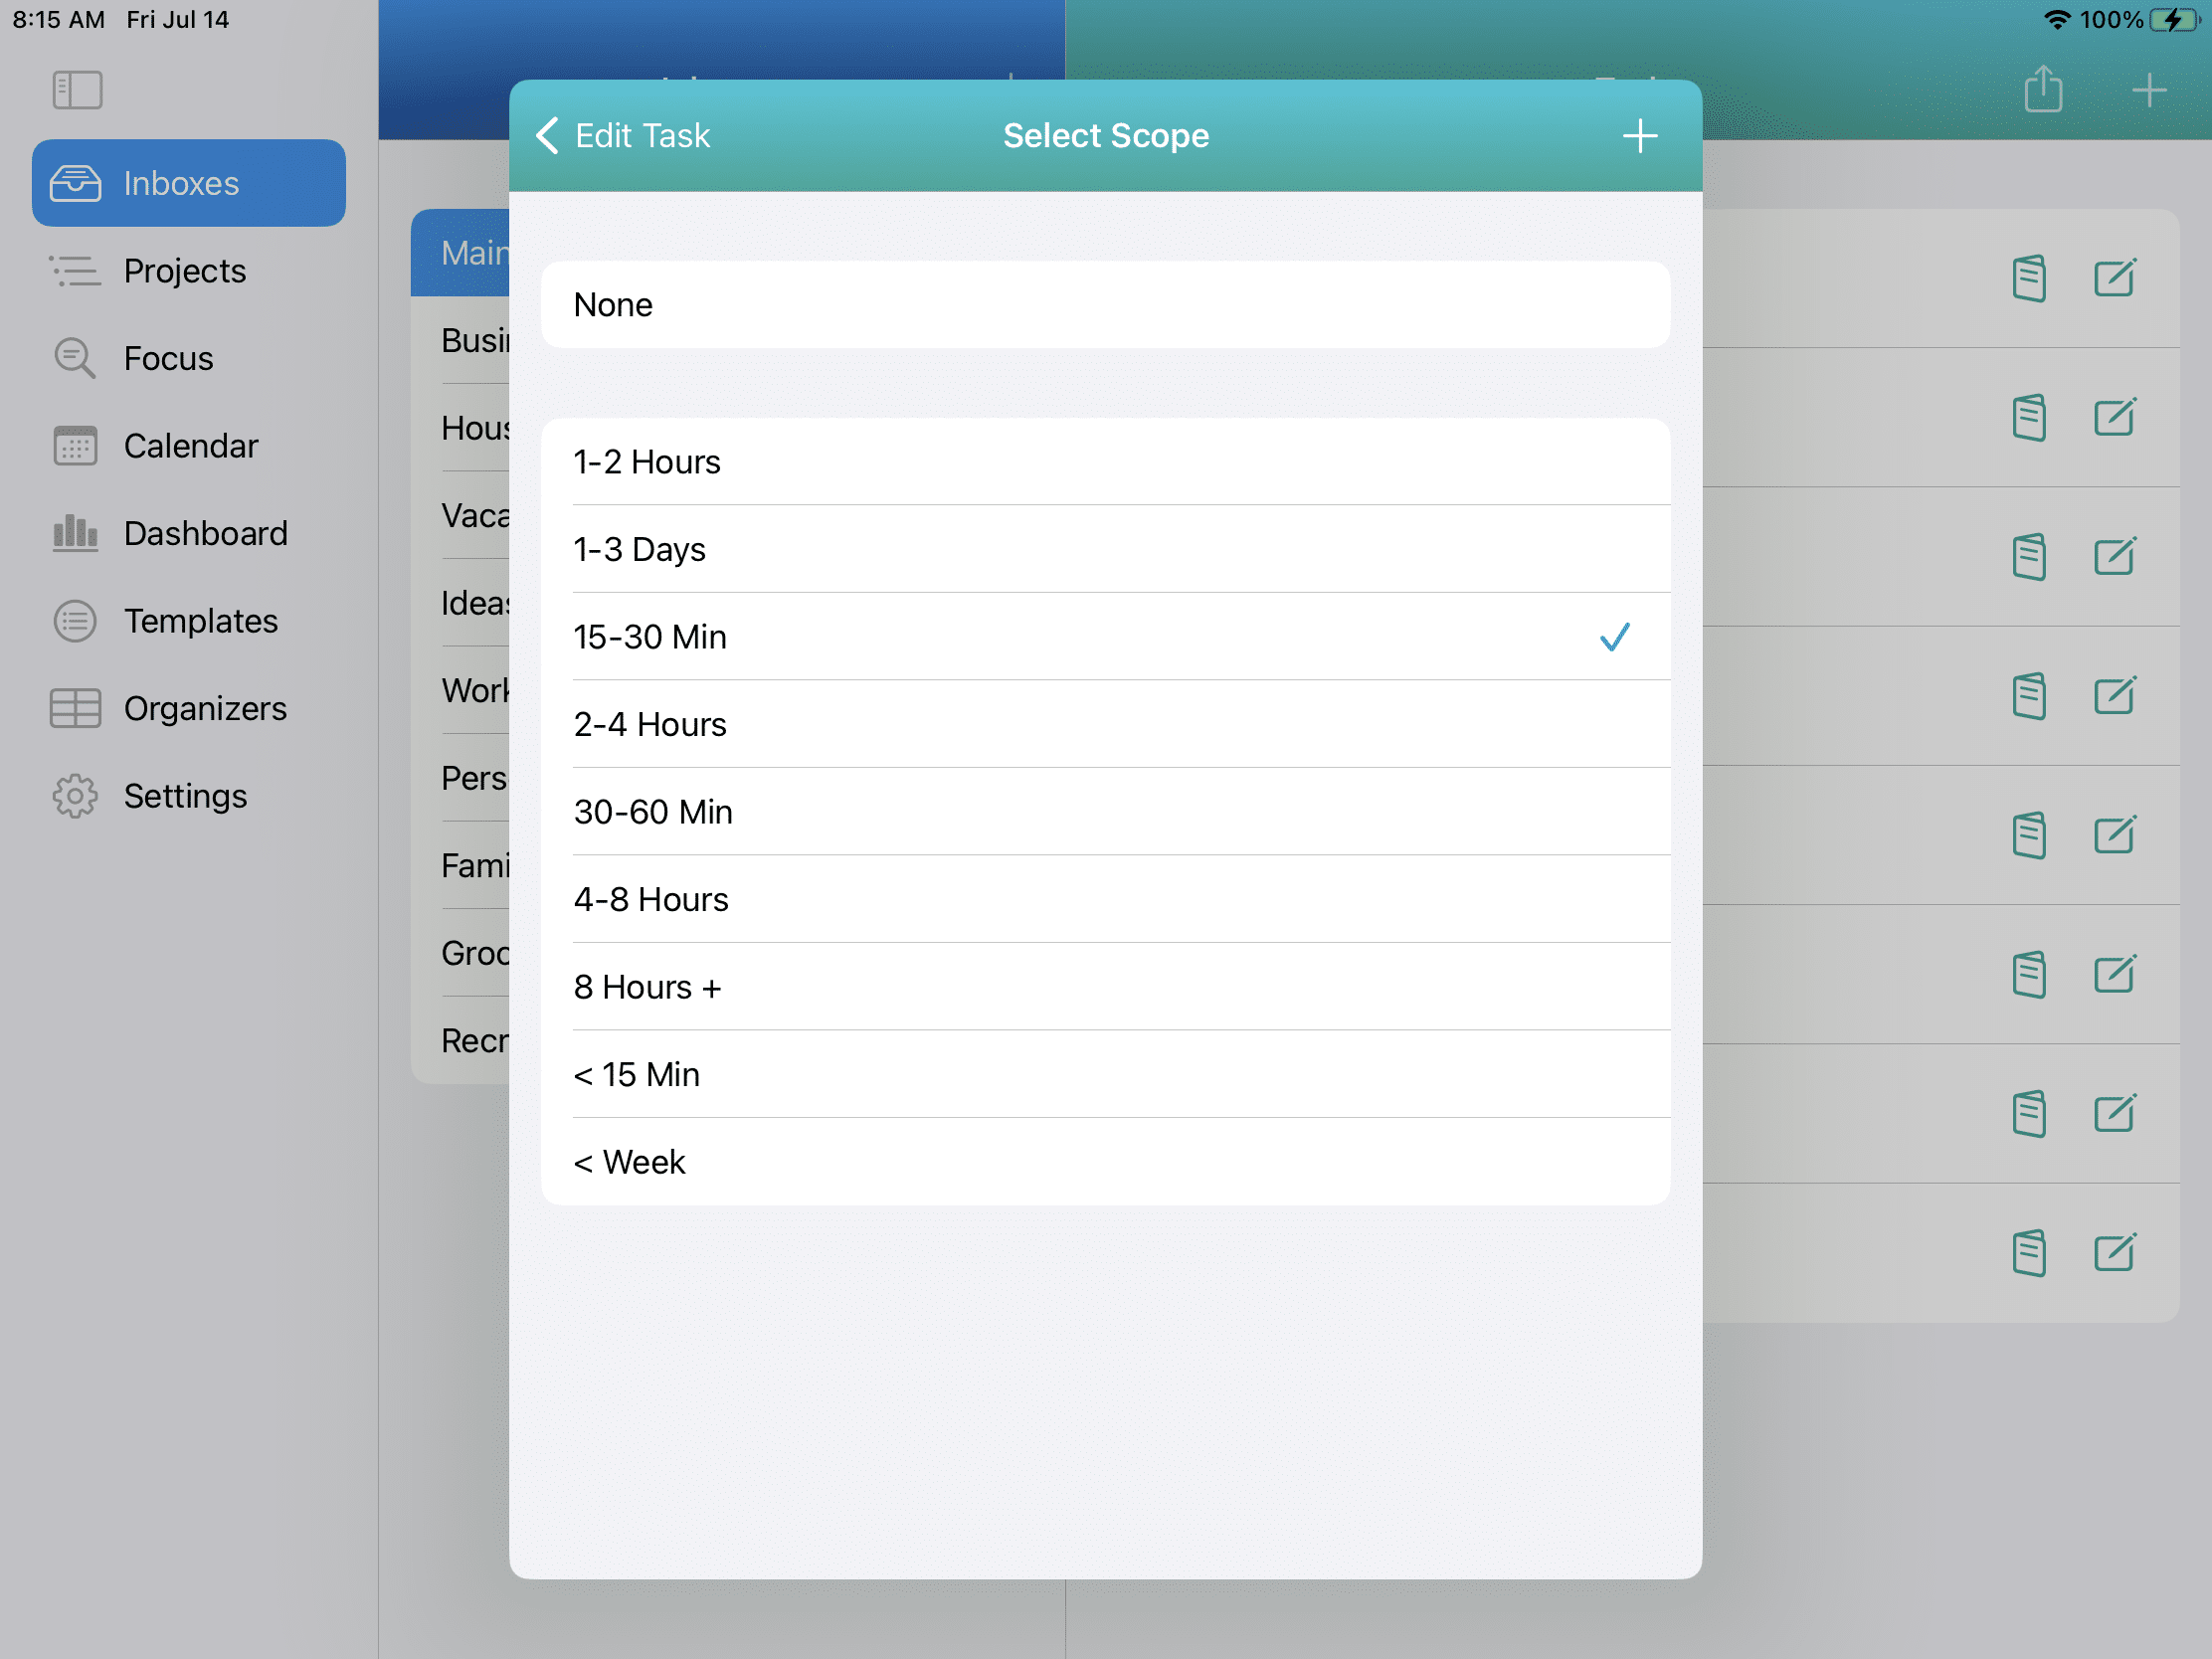
The next Organizer category is Scopes.
A Scope is an approximate duration a task will take in your estimation.
You can then work on those tasks in Focus View by selecting a Scope of, say, Less Than 15 Minutes when you have 15 minutes on your hands.
Examples of Scopes are shown below.
Persona
The last Organizer category is Personas.
A Persona would be someone you want to assign the task to or different roles you play in your life.
If you are assigning a task to another person, you can also provide an email address or mobile phone number to send them the task.
Examples of Personas are shown below:
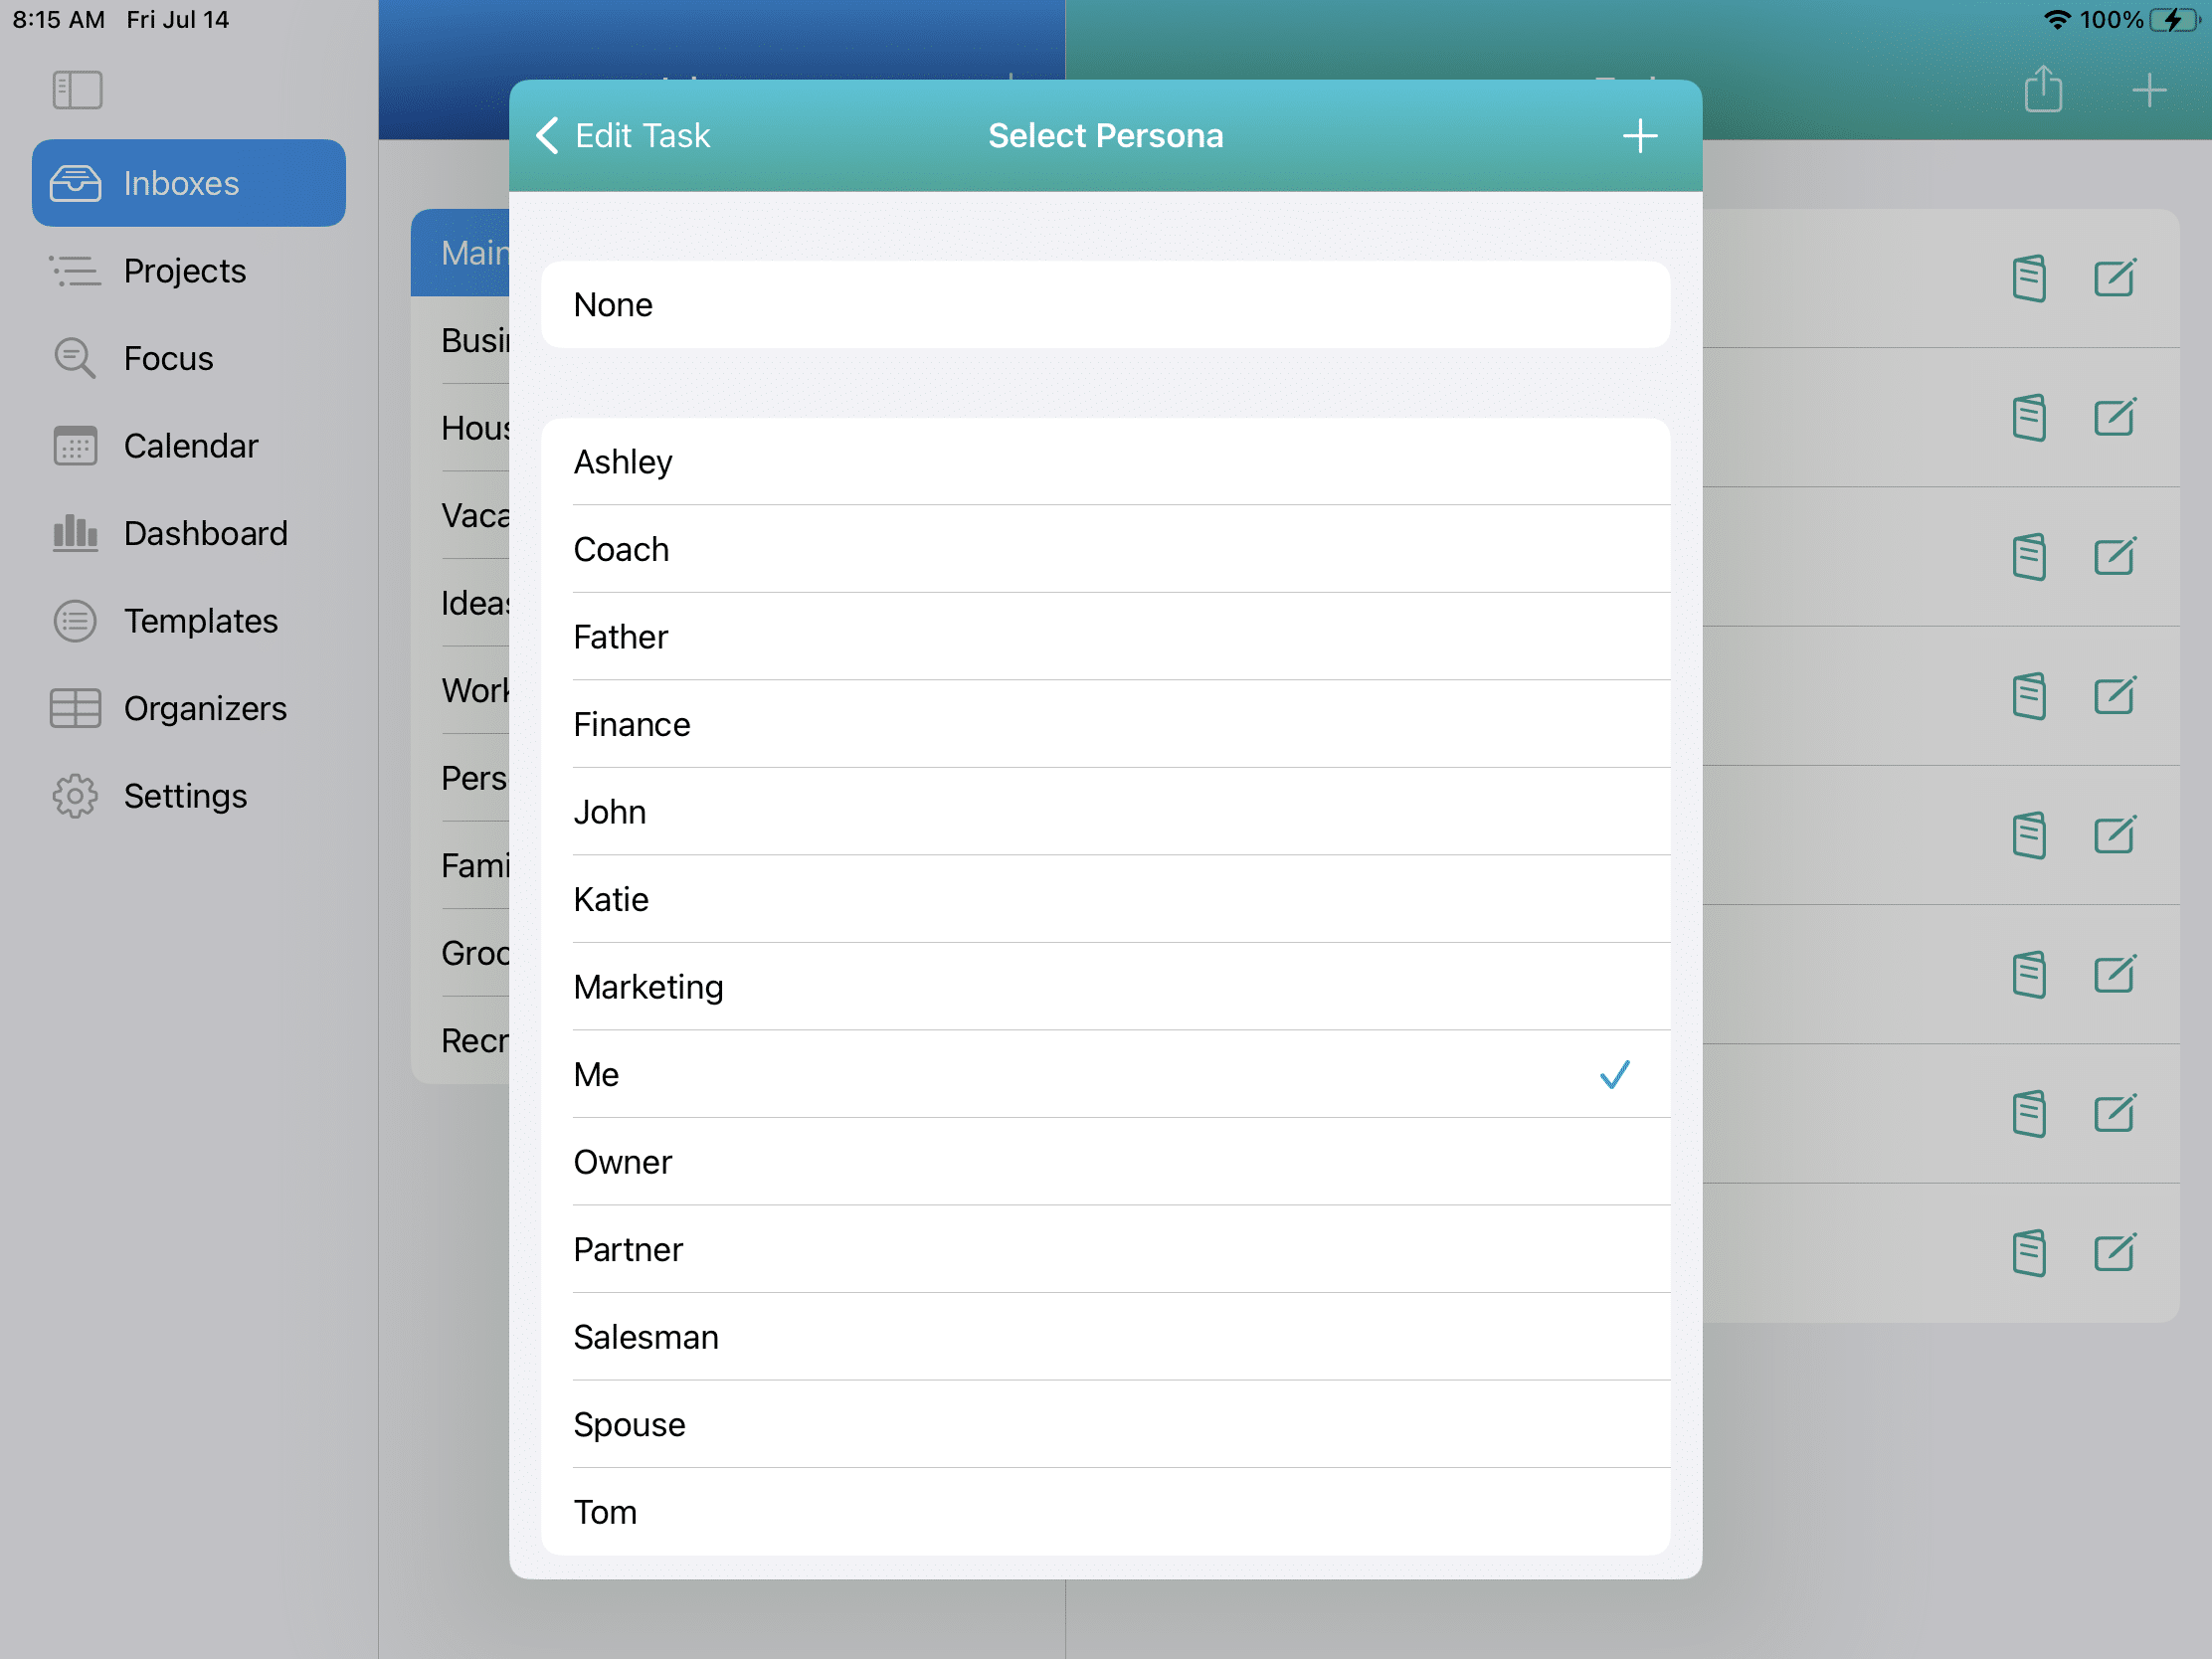
You can create as many of each Task Organizer category as you’d like. You can quickly get Smart Lists of tasks for a particular Task Organizer in Focus View.
Web Links Tab
You can add as many web links (URLs) for each task as you need. Make sure to use the full URL, such as https://www.website.com, rather than www.website.com. In this way, you will be able to click on the web link to be taken to the website automatically.
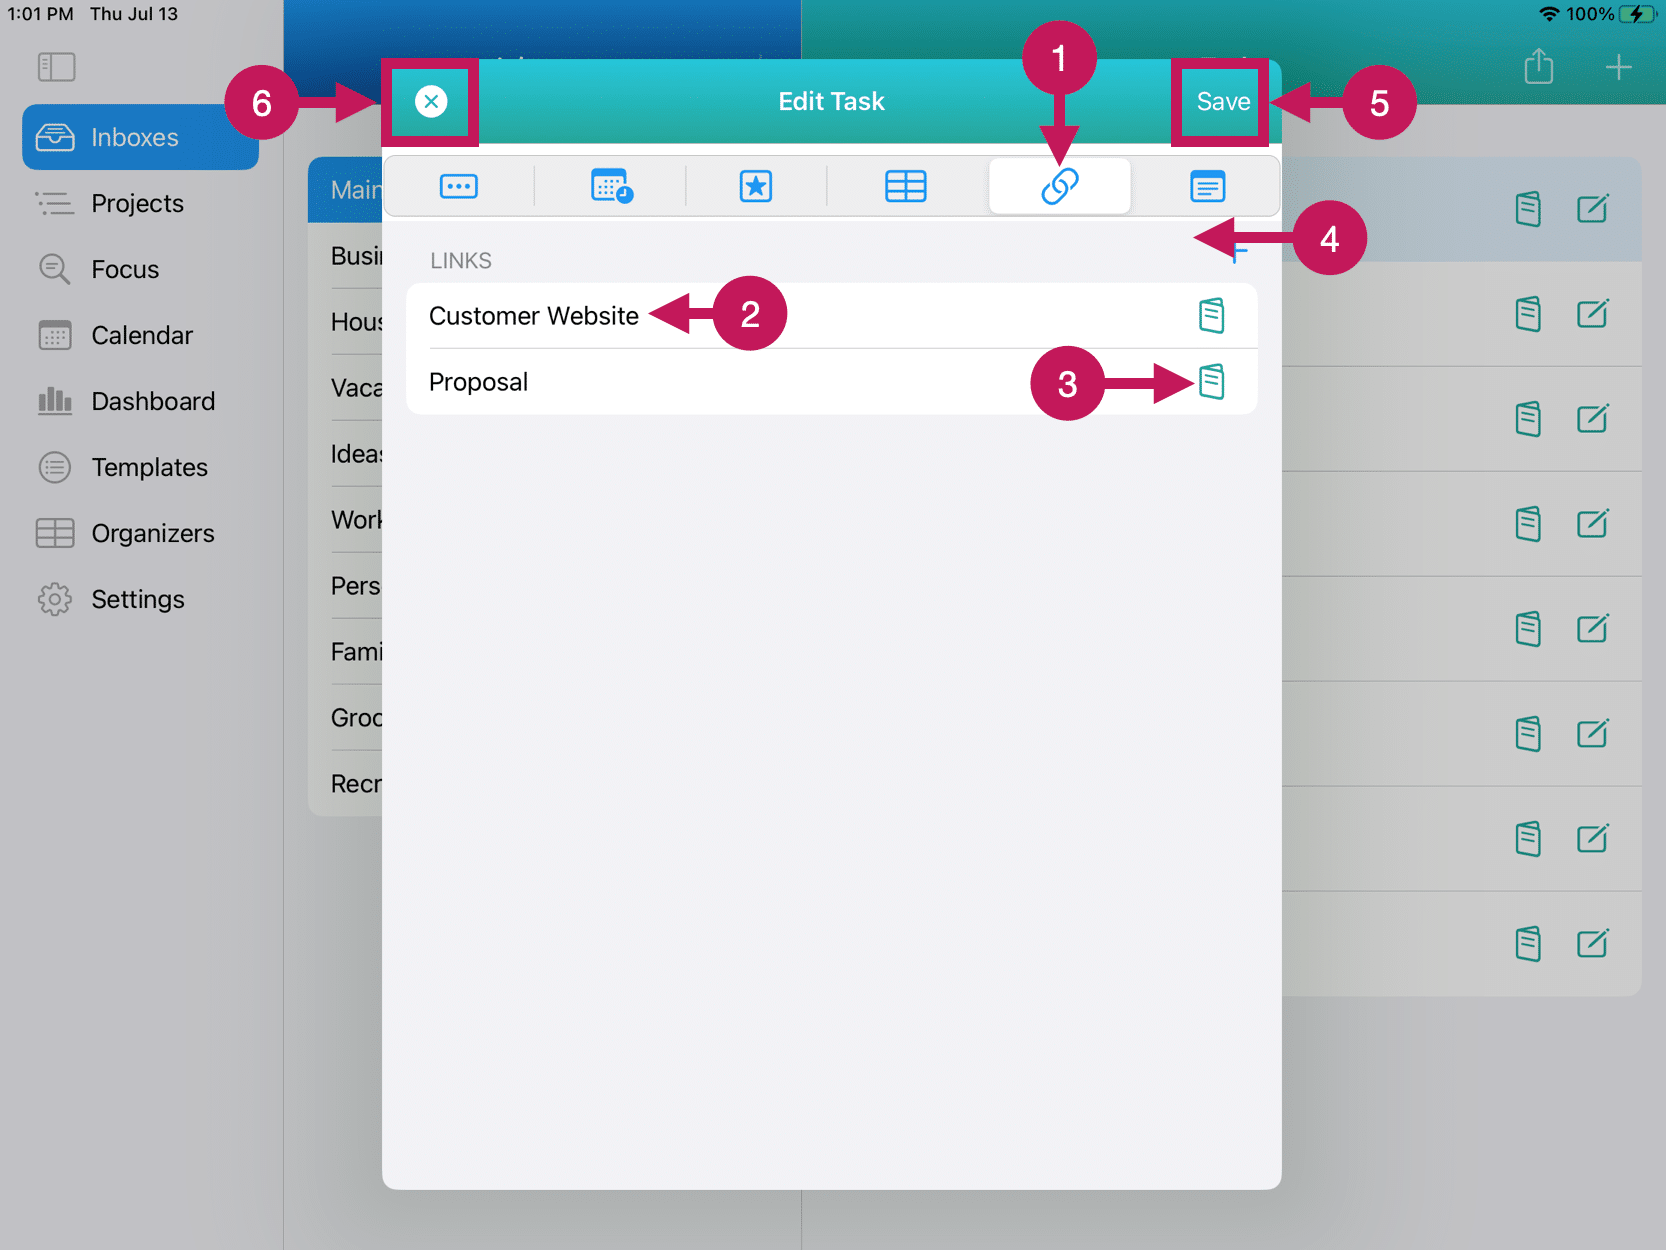
The following is a brief explanation of the numbered items from the Task Editor Web Links graphic above.
1 – Web Links Tab:
Tap or click on the Web Links Tab to add web links to your task or to view one of your web links.
2 – Web Link Name:
The name of your web link appears. You can tap or click anywhere on that row and you will be taken to the web page.
3 – Edit Button
The Edit Button will let you edit or delete the web link.
4 – Add Button: This button will let you add a web link.
5 -Save Button: this button will save the changes you’ve made and close the Task Editor. You can also go to any of the other tabs to make additional changes before saving.
6 – Cancel: this button will cancel any changes you’ve made and return you to the previous View.
Notes Tab
The last tab of the Task Editor Tab bar is the Notes Tab.
You can add as many text notes for each task as you’d like. The length of each note is practically unlimited.
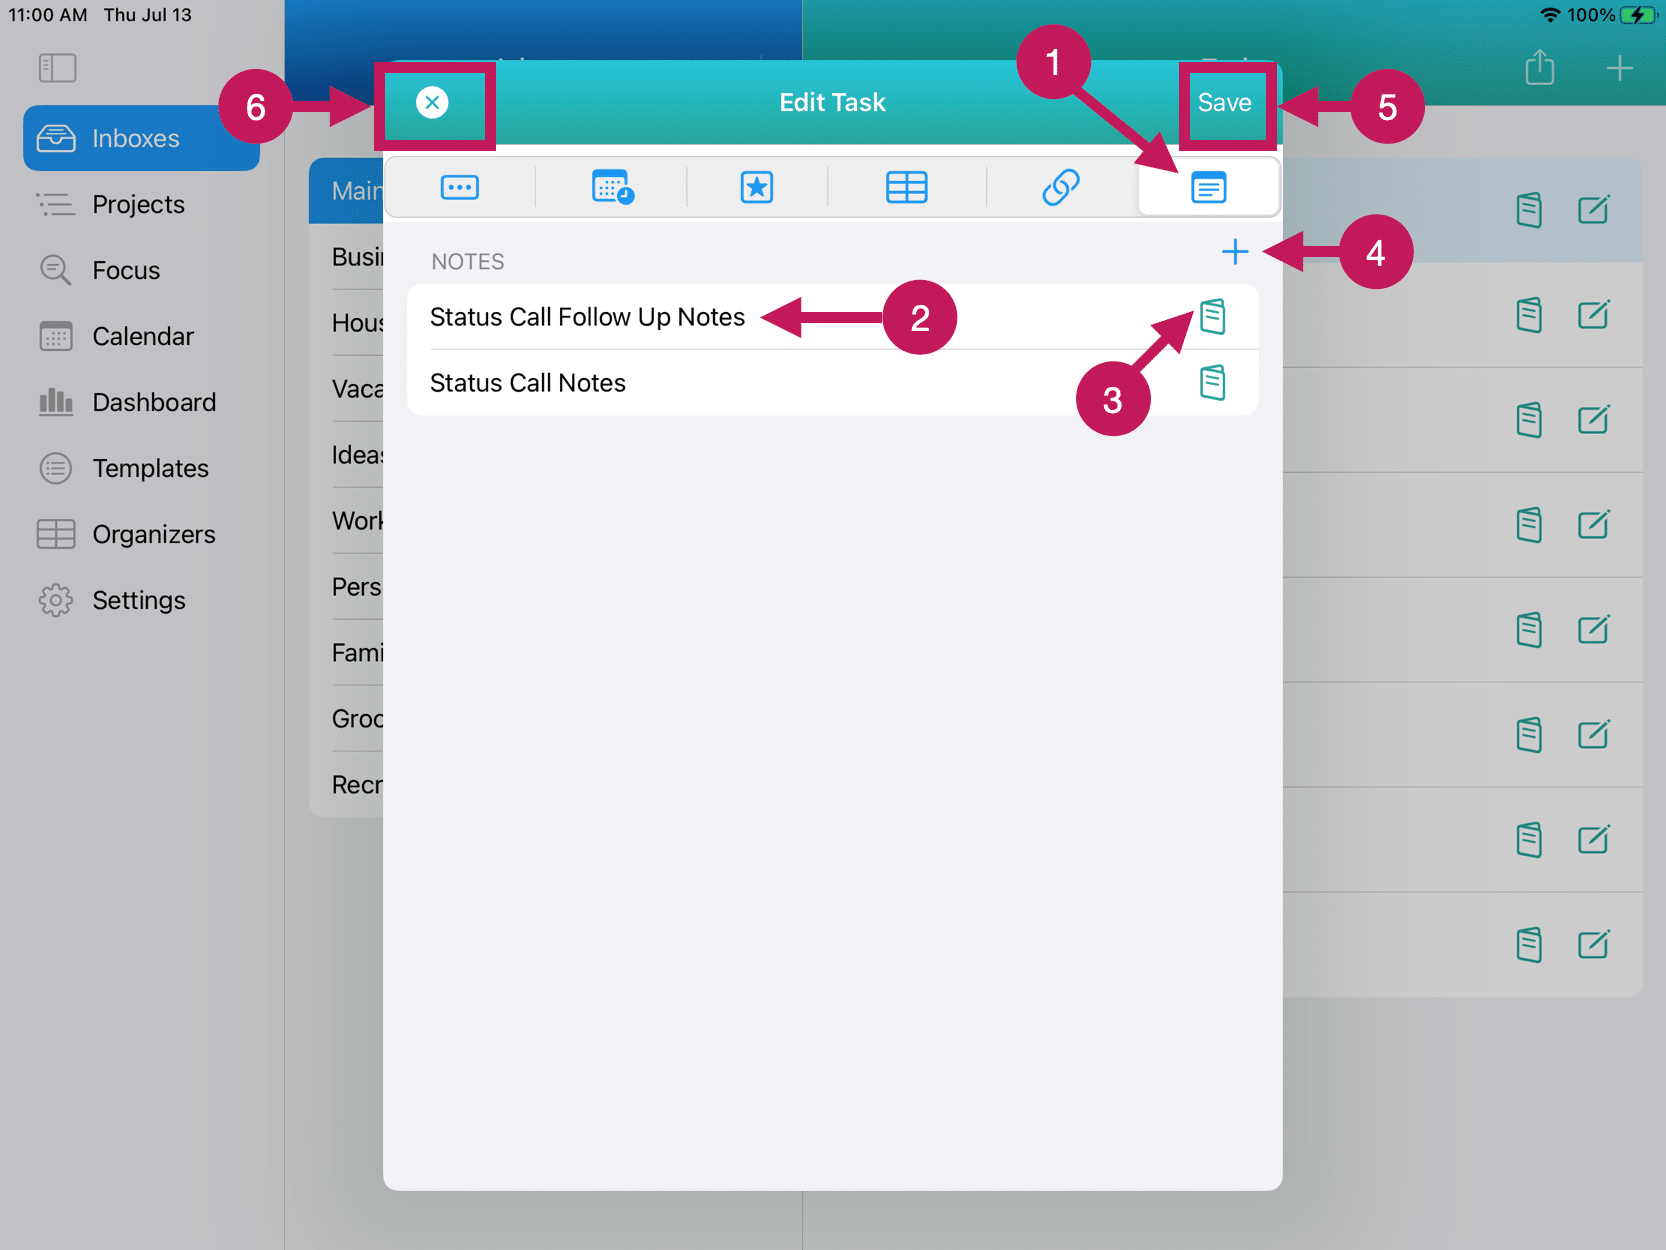
The following is a brief explanation of the numbered items from the Task Editor Notes Tab graphic above.
1 –Notes Tab:
Tap or click on the Notes Tab to add notes to your task or to view or edit one of your existing notes.
2 – Note Name:
The name of your Note appears. You can tap or click anywhere on that row and you will be taken to the Note to view it or edit it.
3 – Edit Button
The Edit Button will let you delete the web link.
4 – Add Button: This button will let you add a Note.
5 -Save Button: this button will save the changes you’ve made and close the Task Editor. You can also go to any of the other tabs to make additional changes before saving.
6 – Cancel: this button will cancel any changes you’ve made and return you to the previous View.

