Getting Started
Step 20
Edit Project Tasks
Once you’ve added your Project tasks, you can begin setting due dates & times, priorities, and task organizers for any of these tasks.
These settings are optional.
Editing Project Tasks is very similar to adding Inbox Tasks
To get started:
1 – Open The Task Editor:
In the image below, tap or click on the Task Editor icon on the far right of the task you want to edit.


The following is a brief explanation of the numbered items from the Task Editor graphic above:
2 – Task Description & Details Tab: shows the task description as well as the Task Details field. You can make any changes to the Task Description that you’d like. The Task Details is basically a long note field where you can add, change, append, or delete any text that you want.
3 – Date & Time Tab: this is where you set or change any date-related elements for the task. This includes due date, start time, and duration, as well as recurring tasks and reminders.
4 -Priorities Tab: this is where you will set or change the priority levels for Importance, Urgency, Impact, and Effort. Red is highest, Orange is major, Amber is medium, teal is some, and blue is low. Black is none or not set.
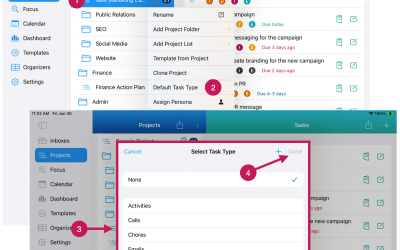
5 – Organizers Tab: these are where you can assign Task Organizers to your task. There are six (6) different Task Organizer Categories – Task Type, List Group, Context, Location, Task Status, and Tags.
6 – Web Links Tab: you can add an unlimited number of web links (URLs) to utilize when you need them. It’s best to copy and paste the URL from your browser so that it includes the full URL. For example, use https://ideastodone.com rather than ideastodone.com or www.ideastodone.com.
7 – Notes Tab: you can add an unlimited number of notes, and each note can contain an unlimited amount of text.
Task Description and Details Tab
The first tab in the Task Editor is the Task Description and Details Tab. This is where you can modify the Task Description. You also have a Details note where you can write notes to yourself about the task.
8 – Task Description: You can edit the Task Description if you need to.
9 – Task Details: You can enter a more detailed description of the task.
Date and Time Tab
The second tab on the Task Editor Tab Bar is the Date and Time Tab. This is where you’ll set the Due Date and, as needed, Start Time, Duration, Recurring Tasks, and Reminders.

The following is a brief explanation of the numbered items from the Task Editor Date and Time Tab graphic above:
1 – Date and Time Tab: tap or click on this button to bring the Date and Time tab for the task into view.
2 – Due Date: shows the task description as well as the Task Details field. You can make any changes to the Task Description that you’d like. The Task Details is basically a long note field where you can add, change, append, or delete any text that you want.
3 – Date Picker: this is where you set or change any date related elements for the task. This includes due date, start time and duration, as well as recurring tasks and reminders.
4 – Month Selector: this is where you will set or change the priority levels for Importance, Urgency, Impact, and Effort. Red is highest, Orange is major, Amber is medium, teal is some, and blue is low. Black is none or not set.
5 – Month Changer: these are where you can assign Task Organizers to your task. There are six (6) different Task Organizer Categories – Task Type, List Group, Context, Location, Task Status, and Tags.
6 – Current Due Date: this will default to today’s date. You can select a different date by tapping or clicking on that date.
7 – Remove Due Date: tapping on this button will unselect the due date that is currently selected.
8 – Start Time: Set a start time for your task. A start time is required, and it will default to the time you specified in the Setting View, Date and Time Preferences.
9 – Duration: this will default to the duration you specified in the Setting View, Date and Time Preferences.
10 – Recurring: tapping on this button will open the window for setting recurring tasks. Recurring Tasks are covered in detail in Step 28.
11 – Reminders: you can add multiple Reminders for a task. Reminders are covered in Step 29.
12 – Save: this button will save the changes you’ve made and close the Task Editor. You can also go to any of the other tabs to make additional changes before saving.
13 – Cancel: this will not save any changes you’ve made and close the Task Editor. If you have made changes, it will warn you and ask you if you want to save your changes or discard them.
Priorities Tab
The third tab on the Task Editor is the Priorities Tab.
You can also use priorities to manage your tasks. IdeasToDone provides four (4) different types of priorities – Importance, Urgency, Impact, and Effort. These priorities are not required. You might use only Importance or one of the other priority types for a task
Each priority type has six (6) levels of priority as follows:
Highest (Red)
Major (Orange)
Medium (Amber)
Some (Teal)
Low (Blue)

The following is a brief explanation of the numbered items from the Task Editor Priorities Tab graphic above:
1 – Priorities Tab:
Tap or click on this tab to bring this tab into view.
2 – Priorities Settings:
Tap or click on the priority level for any of the priority types you’d like to set. One simple tap or click for each priority type.
3 -Save Button: this button will save the changes you’ve made and close the Task Editor. You can also go to any of the other tabs to make additional changes before saving.
4 – Cancel: this button will cancel any changes you’ve made and return you to the previous View.
Organizers Tab
The 4th tab on the Edit Task Tab Bar is the Organizers Tab. There are nine (9) different categories of Task Organizers. These categories are optional but can be very helpful in organizing your tasks and improving your productivity.
The Task Organizer categories are Task Types, List Groups, Contexts, Locations, Task Status, Tags, Time Buckets, Scopes, and Personas.

The following is a brief explanation of the numbered items from the Task Editor Organizers Tab graphic above:
1 – Organizers Tab:
Tap or click on this tab to bring this tab into view.
2 – Organizer Settings Section:
You can set or change any of the nine Organizer categories here. Tap or click anywhere on the row to select an Organizer to set.
3 – Current Organizer Settings:
The current organizer setting is displayed. If one is not set, you will see None in a dimmed state.
4 -Save Button: this button will save the changes you’ve made and close the Task Editor. You can also go to any of the other tabs to make additional changes before saving.
5 – Cancel: this button will cancel any changes you’ve made and return you to the previous View.
Organizer Selection Windows
When you select an Organizer category, you will choose a specific Organizer from the list of options that are presented. If the Organizer option you need has not been set up, you can add one of the fly.
The Organizer Selection Window for each Organizer are covered in Step 11, Go Through the Edit Task Overview.
Web Links Tab
You can add as many web links (URLs) for each task as you need. Make sure to use the full URL, such as https://www.website.com, rather than www.website.com. In this way, you will be able to click on the web link to be taken to the website automatically.

The following is a brief explanation of the numbered items from the Task Editor Web Links graphic above.
1 – Web Links Tab:
Tap or click on the Web Links Tab to add web links to your task or to view one of your web links.
2 – Web Link Name:
The name of your web link appears. You can tap or click anywhere on that row and you will be taken to the web page.
3 – Edit Button
The Edit Button will let you edit or delete the web link.
4 – Add Button: This button will let you add a web link.
5 -Save Button: this button will save the changes you’ve made and close the Task Editor. You can also go to any of the other tabs to make additional changes before saving.
6 – Cancel: this button will cancel any changes you’ve made and return you to the previous View.
Notes Tab
The last tab of the Task Editor Tab bar is the Notes Tab.
You can add as many text notes for each task as you’d like. The length of each note is practically unlimited.

The following is a brief explanation of the numbered items from the Task Editor Notes Tab graphic above.
1 –Notes Tab:
Tap or click on the Notes Tab to add notes to your task or to view or edit one of your existing notes.
2 – Note Name:
The name of your Note appears. You can tap or click anywhere on that row and you will be taken to the Note to view it or edit it.
3 – Edit Button
The Edit Button will let you delete the web link.
4 – Add Button: This button will let you add a Note.
5 -Save Button: this button will save the changes you’ve made and close the Task Editor. You can also go to any of the other tabs to make additional changes before saving.
6 – Cancel: this button will cancel any changes you’ve made and return you to the previous View.